Image Map

9.30.2014

Peek a Frame with Ashley

Hi, Ashley here ready to show you more ideas using Mama Elephant's new Peek a Frames!


The layering possibilities are endless! I started with the large, card size, frame in white. Then I layered the next size but arranged on it's side and trimmed the extra.


Next, I added a tag from Tags a Lot and then added the rounded journaling card from Peek a Frame. Last, be definitely not least, I inked up In My Heart to stamp with sweet little girl and sentiment.


I hope you enjoyed seeing another fun way to use the amazing Peek a Frames!

***************************

AND tomorrow we kick off our October birthday celebration!! See you back here!

Cute Gift Card Holder from Pamela

Good morning everyone! This is Pamela here with another designer series on Tags A Lot creative cuts. Today I used the tag in another way - a gift card pocket tag!

DS - Tags a Lot 2

I started off by die cutting the largest die. I lined up the die to cut the bottom part again for my pocket. The good thing about larger dies is that you can cut it any size you want. Just line up the die to get your desired size.

DS - Tags a Lot 4

I knew I wanted to do some stripes for the front so I used my washi tape to mask off the stripes. I blended some distress inks onto the front for some pretty stripes :)

DS - Tags a Lot 5

I die cut some flags with Polaroid creative cuts and sewed them to the top part of the pocket. I did some partial cutting for the bear and bow. Then I finished off the tag with a sentiment from Carnival Toppers

DS - Tags a Lot 6

I sewed the pieces together for a pocket that fits a gift card perfectly!

DS - Tags a Lot 3

Thanks for stopping by!

9.29.2014

Peek A Frame with Nichol!

Hello everyone! Nichol here today with another card showcasing the Peek A Frames Creative Cuts die collection. For my card share today I thought it would be fun to show how to use the window peek a frame to create a double window that opens from the center of the card to reveal the lovely Christmas scene inside.

PEEKAFRAME1

To create the window I first die cut some smooth white cardstock using the A2 sized Peek A Frame die. Then I die cut the window opening Peek A Frame die with the score line along the left side of the card, leaving approximately equal distance between the left side and the top and bottom of the stitched rectangle. Next I flipped the die over, lining up the cut side with the center of the card and die cut the design again, creating a window that opens towards the center of my card. 

For the Christmas scene inside my card I stamped and watercolored the images from Sweet Havana, Winter Wonderland, and Bloomsies stamp sets using Distress Markers. Once the images were dry, I stamped the greeting from the Merry Greetings stamp set using black dye ink. A bit of clear Wink of Stella Glitter Marker over the hanging ornament bells and some simple black lines to "hang" the bells complete the inside of my card.

PEEKAFRAME2 

I popped the frame up with foam adhesive and adhered the whole thing to a white card base.

PEEKAFRAME3

To view the creation of this window card from start to finish, watch the video below or click HERE to watch on YouTube: 


Thanks for hanging out with me today!

9.28.2014

Tags a Lot with Nichol!

Winter is coming. It's Nichol here today and with that cold winter weather, the holiday season will be upon us before we know it!

One of my favorite ways of dressing up small gifts is by creating my own die cut boxes from Christmas-themed patterned papers on the Silhoeutte Cameo. And every gift box needs a beautiful tag to adorn it! The Tags A Lot Creative Cuts die collection makes the perfect gift tags!

Today I have a set of five gift boxes all embellished with wonderful little tags die cut using the awesome new Tags A Lot Creative Cuts dies. I used the two smallest tags from the collection for these elegant silver and green packages.

Tagsalot1

To create the tags, I die cut five tags from smooth white cardstock and one of each size from vellum using the Tags A Lot Creative Cuts dies. The hole reinforcements were all cut from silver foil specialty paper.

Tagsalot2

I stamped greetings and images on each of the tags using an assortment of images and greetings from the Confetti, Winter Wonderland, Merry Greetings, and No Peeking stamp sets. I used all gray inks and Versamark embossed with silver embossing powder to keep with the color scheme of the gift set.

Tagsalot3

To view the creation of these holiday-themed gift tags from start to finish, watch the video below or click HERE to watch on YouTube: 


Looking for more Tags A Lot inspiration? Check out these projects by the Mama Elephant Design Team:

9.27.2014

Winter Wonderland with Ashley

Hello! It's Ashley here today sharing the new Creative Cuts that were just released for the Winter Wonderland stamp set.


This is one of my favorite holiday sets so I am thrilled that the dies have been released! This card was really inspired by the sentiment I used from the Winter Wonderland stamp set. After I chose my sentiment I stamped the deer in sparkly gold ink then die cut them out. 


I stamped the sentiment next on the scalloped tag from Tags a Lot and then ground it with the banner from the same die set. I set the scene with the medium sized tag, again from Tags a Lot and then added a few coordinated patterned papers. 


A little more sparkle was added to the card with some sequins and enamel dots. I'm so excited to have another card done for Christmas! Thanks for joining me today!

9.26.2014

Believe in Magic Creative Cuts with Nichol!

Hello there! Nichol here today with a Designer Series Christmas card share showcasing the new Believe In Magic Creative Cuts dies. The snowglobe design of the Believe In Magic Stamp Set and coordinating dies lends itself to one of my favorite kind of cards to create: shaker cards!
I combined the Believe In Magic Creative Cuts dies with the Femme Frames Creative Cuts dies to create a fun snowglobe shaker card complete with reindeer, citscape and starry night sky!

BelieveInMagic1 

To create the front of the card, I first die cut some light gray cardstock using the Femme Frames Creative Cuts stitched rectangle die and added "stripes" with the wide stripe border stamp from the Basic Borders Stamp Set. I stamped the greeting from Believe In Magic using dark gray and red inks.
I stamped the snowglobe base on white cardstock using a dark gray ink and die cut it with the coordinating Believe In Magic Creative Cuts die. Using the snowglobe base for reference I positioned the globe and used a bit of tape to hold it in place and ran it through my die cutting machine to create the "window".

I die cut a piece of transparency and glued it to the backside of the front panel of the card and added two layers of foam tape around the opening to "hold in" the Martha Stewart Snow Glitter.

To finish the inside of the snowglobe I stamped the cityscape and reindeer from the Believe In Magic Stamp Set on smooth white cardstock using black ink and die cut them with the coordinating dies. I stamped the moon with yellow ink and die cut it as well. I die cut another piece of light gray cardstock using the Femme Frames Creative Cuts stitched rectangle die and adhered the "scene" to the backing piece. Then I added the glitter to the piece with foam adhesive and adhered the backing to sandwich the shaker elements inside the card.

Layered ribbons, sequins and baker's twine tied around the snowglobe complete the card.

BelieveInMagic2

To view the creation of this holiday-themed card from start to finish, watch the video below or click HERE to watch on YouTube:


9.25.2014

Mega Tags with Ashley


Hi! Ashley here sharing another fun project you can make using the new Tags a Lot Creative Cuts.


For this project, I dressed up a simple gift bag using three of the dies found in Tags a Lot. First I die cut the largest tag from patterned paper. Next I layered in the medium sized tag and stamped it with one of my all time favorite sentiments from Confetti. To bring attention to the sentiment, I die cut the banner in Tags a Lot twice and wraped it around the medium tag. I chose the simple hole reinforcer die for my tag, also included in the Tags a Lot die set.


A few enamel dots, twine and some gold glitter finished off my project. Gift giving just got easier with these awesome dies! I can't wait to make more tags!

Cute Bear Tags with Elena

Hey, it's Elena!

 Even though this the last project I'm sharing with you here this month, it was the first one I created. When I received the Mama Elephant dies, I was trying to make little cards and things for the kids to brighten up their first days at school.

I used the new Tags a Lot dies to create these little bear hug packages for lunchtime treats:

tags a lots


Lemme tell you, they went over really well. My kids are huge fans of the carnival cupcakes set that was released last month.

tags a lots

I combined the adorable bear image with a custom sentiment using sketchy letters.

And inside the packages? Had to be bear cookies, of course!

tags a lots

I hope you like it, and thanks for stopping by!

♥.

9.24.2014

Winter Wonderland Creative Cuts with Geralyn!

Hi everyone! Geralyn here today to share with you a project using the new Winter Wonderland Creative Cuts! The Winter Wonderland stamp set was one of my favorites last year and I'm so glad Mama Elephant released coordinating dies for this set.

I started by misting a 3x3" piece of cardstock with various spray mists. Then I stamped two of the birch trees from Winter Wonderland on the cardstock, and added a spritz of Mister Huey Shine to give the cardstock some shimmer.


I created a circle negative on a 4.25x5.5" piece of cardstock and adhered my misted cardstock underneath it with foam adhesive to frame my wintry scene.


I stamped my Winter Wonderland deer and cut them out using the coordinating Creative Cuts, then adhered them with foam adhesive inside my circle.


To finish it off, I stamped a sentiment, added a strip of washi tape, and tied some glitter baker's twine around the cardstock before adhering it to a standard size card base.


Here is my completed card! I love how easy it was to make the deer stand out by cutting them out with the Creative Cuts and giving them the white outline. 


Thanks for stopping by!

9.23.2014

Cozy Tag with Nichol!

Happy First Day of Fall!

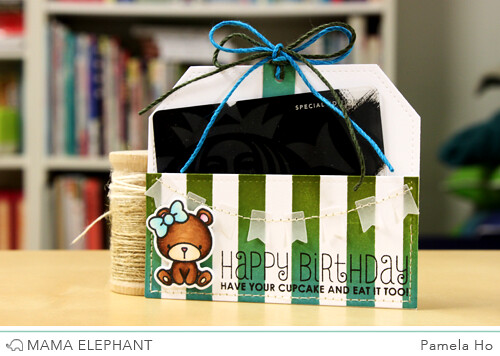
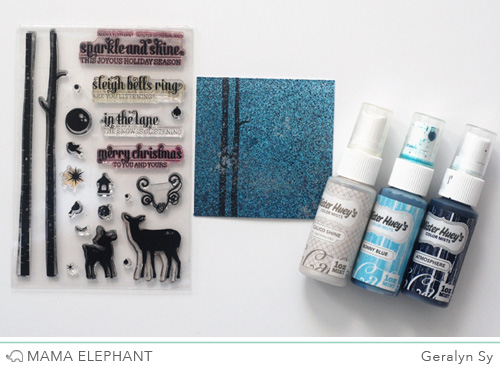
Christmas is three months away so it's the perfect time to start your holiday paper crafting! Today I have an oversized gift tag adorned with stamped, colored and die cut Christmas images perfect for adding to a package, a plate of goodies for a neighbor or even adhering to a card to send to a loved one. Mama Elephant just released the Cozy Christmas Creative Cuts dies to coordinate with the super adorable Cozy Christmas Stamp Set.

CozyChristmas_NicholMagouirk2

I created a Christmas scene by combining Santa, the tree, and gifts from Cozy Christmas with the car from Carnival Toppers and teddy bear from Carnival Cupcakes. The oversize tag and banner are from the new Tag A Lot Creative Cuts die collection.

I stamped all the images to color on smooth white cardstock and colored them in with Copic Markers.
For Santa I used the follwing colors to color in his skin:

CozyChristmas_coloring1

To color in the red for Santa's suit, I started with R14.

CozyChristmas_coloring2

Next, I added my mid-tone red color, R46. I tend to add less to begin. I can go back and pull in more of this color as needed after adding my darkest color.

CozyChristmas_coloring3

For my darkest red color, R39, I used it to add some shadowing:

CozyChristmas_coloring4

After blending, here's sweet Santa (pretend I colored in his pants and for that matter his nose too....)

CozyChristmas_coloring5 

To color in the "white" on Santa's suit and beard I used these Cool Gray Copic colors:

CozyChristmas_coloring6

To color in the tree I like to use the feathering technique starting with the lightest yellow-green Copic color, YG93.

CozyChristmas_coloring7

Next, I feathered in my darkest yellow-green color, YG99, from the top of each layer of the tree.

CozyChristmas_coloring8

Next I filled in with my mid-tone yellow-green Copic Marker, YG97.

CozyChristmas_coloring10

To add some detail shadowing under each "layer" of the tree I added some Cool Gray 7. 
I colored in the smaller images and die cut them with the coordinating Cozy Christmas Creative Cuts, Carnival Toppers Creative Cuts and Carnival Cupcakes Creative Cuts.

For the background of the jumbo tag, I masked off the stitched border using post it tape and repeatedly stamped the greeting "merry and bright" from the Polar Pals stamp set to give my tag a subtle text background.

I stamped the greeting from Cozy Christmas on the banner from Tags A Lot and embossed it with gold embossing powder.

CozyChristmas_NicholMagouirk

 This tag is all ready to tie to a package and give to someone special! I hope this has inspired you to start  your holiday paper crafting....

Thanks for hanging out with me today!


9.22.2014

Peek a Frame with Pamela!

Hello! This is Pamela back for another project using the new Peek a Frame creative cuts. This time, I'm using it as it was intended - a framed window where you can flip and see what is underneath. I first masked my card base with some post-its and a Cityscape mask.

DS - Peek a Frames 8

I did some blending with orange and yellow on top and stamped the ferris wheel from Around We Go

DS - Peek a Frames 7

I cut the 4x3 stitched rectangle and cut the window panel on top.

DS - Peek a Frames 6

And here's the complete card! I love how you can open up the window to see the entire scene!

DS - Peek a Frames 5

Thanks for reading!

9.21.2014

Believe In Magic Creative Cuts with Emily!


Hi, it's Emily here, and today I'm showcasing the Believe In Magic Creative Cuts. Sadly, this is also my last post as a Mama Elephant Design Team Member. Many, many thanks to Kryssi and Angela for asking me to be a part of this outstanding team. ♥


I used the dome die from Believe In Magic Creative Cuts to create a shaker as the main focal point, which also serves as the background for the decorative elements - bear from Carnival Cupcakes (Creative Cuts), car from Carnival Toppers (Creative Cuts) and gift from Cozy Christmas (Creative Cuts).


I added just enough sequins to give the card a lot of shake but not too many such that the cityscape would be covered or distract from the rest of the design. The striped border stamp that grounds all the elements is from Remember December. I love that it looks like washi tape! The sentiment is, of course, from Believe In Magic.

Thanks so much for stopping by!

9.20.2014

Tags a Lot with Nichol!

Happy Saturday Mama Elephant friends!

It's Nichol here today with a gift tag idea showcasing the brand new Tags A Lot Creative Cuts Die Collection. I've used the second largest tag for my project today and adorned the tag with images and/or die cuts from Pandamonium, Cozy Christmas, Landscape Trio, No Peeking and Confetti.
I die cut the second largest tag from some khaki cardstock and used a stencil and embossing paste to add "falling snow" to the background of my design. Once the embossing paste dried, I adhered a hole reinforcement die cut with the largest of the three designs in the Tags A Lot Creative Cuts Die Collection.

I die cut two additional tags from white cardstock and used the Landscape Trio Creative Cuts dies to create "snow drifts" along the bottom of my tag. 

TagsALot_NicholMagouirk1 
I die cut the banner from vellum using the Tags A Lot Creative Cuts dies and stamped and embossed a greeting from the No Peeking Stamp Set on the banner. I wrapped one end of the banner around the top layer of "snow" and stapled it in place with the Tiny Attacher. I adhered the snow drift to the tag with foam adhesive.

I stamped Santa from Cozy Christmas and the standing panda bear from Pandamonium on smooth white cardstock and colored in the images. I die cut both using the coordinating Cozy Christmas Creative Cuts die and Pandamonium Creative Cuts die. I trimmed the santa hat from the rest of the image and glued it in place on top of the panda's head. I adhered the santa panda to my tag using foam adhesive.

I stamped, colored and die cut three of the gift packages from Cozy Christmas, die cut the images and adhered them to my tag.

I finished the design with a sprinkling of glitter paper confetti created with the Confetti Creative Cuts die.

TagsALot_NicholMagouirk2

Watch the video below or HERE on YouTube to see this tag come together from start to finish:


Be sure to check out these additional Tags A Lot Creative Cuts ideas: