12.31.2013

Designer Series: Love From Above with Nichol Magouirk

Hello there Mama Elephant fans!

Today I have a new card share and how to video showcasing the Love From Above Stamp Set.
I wanted to create a card where the sweet little cupid/angel appears to be hanging out in the clouds in a heart-filled sky. I used patterned paper for the background and layered on stamped, colored and cut out images and a stamped greeting for this sweet card.

IMG_4295

I colored in my angel with Copic Markers and layered two stamped and colored images for depth and dimension.

The Landscape Trio Border Cloud Die is the perfect companion for the Love From Above Stamp Set and makes for a lovely finishing touch along the bottom edge of the card!

IMG_4296

These are the Copic Markers I used to color in the angel and cloud:

IMG_4302


I hope this has inspired you to create dimensional layered stamped and colored images for your next creative project.
Thanks for stopping by!

12.30.2013

Designer Series: XOXO Layout with Geralyn

Hi everyone, Geralyn here today and I'm sharing a mini-layout I made with the XOXO stamp set. While this set may seem Valentine's-themed, it is really quite versatile with its bold and graphic designs.

This layout was inspired by the 'do what you love, love what you do' banner stamp. I decided to create this layout as a reminder for myself to continue to do just that in the new year! This layout will go into my 6x8 book.


The hearts border stamp was stamped repeatedly to create my own patterned paper.


The banner stamp was stamped with Mama Elephant's mojito ink, which is a really nice shade of green.


That's all from me today. Thanks for visiting!

12.26.2013

Designer Series: Love Quotes with Jenn Biederman

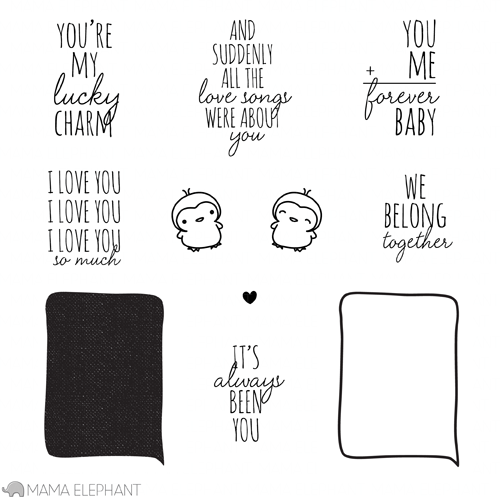
Morning, it's Jenn! I hope you all had a great Christmas! Before you head out for those after-Christmas steals, check out this layout and interactive card using the Love Quotes set.

I love all the elements of this set. The speech bubble is darling, and worked well with the birds that I added.

JennB_LoveQuotesLO

The new Love Quotes and Landscape Trio Creative Cuts added some originality to this layout, along with the Inline Letters Creative Cuts in that perfect pink glitter POW paper. The Landscape Trio grounded my photo and balanced out the layers. I also cut an Embellished Tag out of vellum to add another textured layer to the page.

JennB_LoveQuotesLO_Detail2

Here are some detailed photos:

JennB_LoveQuotesLO_Detail3
JennB_LoveQuotesLO_Detail4

I also created a card using matching papers/colors. This card has an interactive element allowing one of the birds to slide on a track up to the other bird. I've included some photos of the process.

JennB_LoveQuotesCardTut_8

I created my base and pocket by diecutting the 3 1/2 x 5 background with the Landscape Trio Creative Cuts. I shortened up and diecut the front polka-dot piece and sewed the pieces together to create the pocket.

JennB_LoveQuotesCardTut

I cut the birds using the Love Quotes Creative Cuts and inked them up a little bit with the Lollipop Creative Color Pigment Ink...

JennB_LoveQuotesCardTut_1

Now here is where I used my X-acto knife and cut a small thin strip down a path on the front of the pocket (be sure to use a thicker piece of cardboard behind the front pocket to avoid cutting through the back). This is going to be the track for the bird to follow.

You will also want to cut a tag using the Embellished Tag Creative Cuts.

JennB_LoveQuotesCardTut_2
I placed a thicker piece of vellum (you can use a heavy weight cardstock too, but this is what I reached for) onto the back and folded the piece. The vellum didn't add a ton of thickness, yet was strong enough to move up and down the track,
JennB_LoveQuotesCardTut_3

I glued the back of the folded part, then carefully lifted up the flap enough to allow the glued piece to slide through. Press down well once placed in the lowest position (the tag needs to be in the lowest position too).

JennB_LoveQuotesCardTut_4

I ended up switching out my pink tag to the thicker chipboard. I punched a hole and tied on brown polka-dot ribbon. Once I pulled the tag all the way up, I stamped the We Belong Together sentiment onto the tag.

JennB_LoveQuotesCardTut_5

The sentiment and motion of pulling the birds together worked out so well! This is what the card looks like prior to pulling on the tag...

JennB_LoveQuotesCardTut_6

Now the birds are together. Love!

JennB_LoveQuotesCardTut_7

I hope you enjoyed today's layout and card! Emily will be back here tomorrow with some more creative goodness!

Catch you later!

12.24.2013

Guest Designer: Jen Rzaza

Hi there, it's Jen Rzasa with a guest post for you all today!  It has been a joy to join in with Mama Elephant this month, and I have been completely charmed by one of the new sets...Pandamonium!  (I actually love all of the sets in the newest release, hehe)

The card I made for you today features the sweet little smooching pandas- I stamped them first onto white cardstock, then fussy-cut around them.  The pandas (along with the three punched hearts) are popped up with foam tape for a little dimension:


The sentiment comes from the trendy new Mama Elephant set, XOXO! I adore the little arrow that goes through it!

You might be curious about the background...while mass-producing some Christmas cards for my mom to give out (I mail her about 30-50 cards every year), I took a bit of a shortcut.  I used my trusty ink blending tool to make a lovely background, scanned it into my computer, then printed them out!  Photoshop allowed me to recolor the background so that I had a few options.  Of course, I printed extras to use as card backgrounds year-round  :)

Thank you so much for stopping by!

12.23.2013

Designer Series: Pandamonium with JJ

Hey there! Just popping in on the Mama Elephant blog today to share a couple cards I made with the new adorable set, Pandamonium! Are you ready for complete cuteness?


My first card is a one layer number. I stamped the lanterns and colored them in with Copics. Then I added in the dancing bears! I thought the sentiment from Good Times was appropriate for this bear dance party. Are you smiling yet?


My next card will totally not make sense to you unless you saw the movie Kung Fu Panda. If you haven’t seen the movie, Po (the Kung Fu Panda) says this when he does one of his signature moves. Think of it as the Kung Fu Panda version of “BAM”! So instead of dancing, he’s kicking! The fun background was created using the rays stamp from Sunny Skies. The sentiment was die cut with the Inline Letters dies. Skadoosh!


That’s it for me! Thanks so much for taking the time to check out my cards today! Have a good one! Mahalo and Aloha, jj

12.20.2013

Designer Series: Love Quotes with Lauren Bassen

Hi there! Laura Bassen here and today I have a simple card to share with you using the new Love Quotes stamp set. This fun set is perfect for Valentine's Day, but it could also be used to create little notes to give to your children to let them know how much you love them. To create my card I used some pattern paper for the card base.

Mama Elephant~Love Quotes

The Love Quotes stamp set has coordinating dies for the little penguins and for the speech bubble, which made creating this card super easy. I used the new Landscape trio dies to create my snow hills. I embossed my speech bubble and sentiment in white and colored those adorable little penguins with Copics.

Mama Elephant~Love Quotes


I just love the font combinations in this set, and those little penguins are sure to make anyone smile. Thanks so much for looking!

12.19.2013

STAMP HIGHLIGHT : XOXO

We end this week's Stamp Highlight with XOXO, a nice bold and graphic set.  I must say that this set is for the Jack of all trades. A versatile set that would look great in cards, scrapbooking and tags. I also especially love the tag top that stamps perfectly into our embellished tag creative cut which will give it some pop of color.


Let's take a look at some projects that were handcrafted with love by our Design Team. 

Emily created a shaker card using the Embellished Tag Creative Cuts, acetate and microbeads. She stamped the sentiment first, along the bottom of the tag, then the panda which she covered with a mask before stamping the ombre cascading hearts.


Laura used the row of tiny hearts to create an embossed background pattern. She also embossed her sentiment and punched it out with a circle punch.


JJ used the XOXO set with the new Landscape Trio dies to create a modern vellum valentine! She used the curved line dies to create a multi-layered, multi-colored background. The vellum detail is continued along the bottom of the card with a row of reverse cut hearts (Embellished Tag dies) lined with red tinted vellum.


Jenn used the hexagon shape to repeatedly create a background in shades of Apple and Lollipop. The black and white hexagon and sentiment stand out among the monochromatic hues.

 Nichol created a heart background using the ombre effect with the Mama Elephant red and pink inks. She layered a stamped panda holding a heart and finished her card with a greeting stamped in black and pink inks.


Jen dry embossed the card base and heat embossed the hearts onto the watercolory paper. There are 2 layers of foam tape behind the banner to really pop it up.


All thanks to you, this release has been a blast! We are so happy that we able to do what we do, so you can do what you do! Until next time… 
- XOXO Mama Elephant.

12.18.2013

STAMP HIGHLIGHT : LOVE QUOTES

We have Love Quotes for our Stamp Highlight today. These sentiments makes my insides go warm and fuzzy especially when you pair them up with these darling birds! Kryssi was at her best again when creating Love Quotes. This set also has a coordinating die set which makes it even more fun! Go ahead, you know you belong together...


Let's take a look at what our Design Team have for us today!

Jen cut out some patterned cardstock to isolate the hearts, and muted the pattern (beneath the popped-up section) with vellum.  She scored along the outside edge of the card base and stamped the sentiment in the corner.


Emily created a punny card by creating a charm bracelet using the dotted balloon string from the Party Kit stamp set. She added the sweet birds as the charms on the bracelet to go with the fun sentiment.


Nichol created a cloud background using the new die cuts and tucked in sweet little stamped birdies that she colored in with pencils.


JJ used the coordinating speech bubble die to create a sequin shaker card. Check out JJ's blog to see how she used the tag die to create the shaker.


12.17.2013

STAMP HIGHLIGHT: PANDAMONIUM

Today's Stamp Highlight is a pandemonium with Pandamonium! We are so happy you love these little fellas {thisssssssss} much! We really do love the intense contrast of these Panda bears and how they look like a doodle that came to life! These characters are so versatile that they can be used for any occasion! 

These Pandas makes me so happy! I hope they make you happy too!


The Design Team has overloaded this blog post with tons of cuteness!

Jen thought it would be cute to have the panda trying to hold a huge sign with the long sentiment.  She attached the sign with foam tape at an angle, and stamped/cut separate little hands to adhere on top.  She also added a bit of a shadow with a Copic marker.


Jenn created a shaker element using a 3x4 PL card and clear pocket. The non-traditional color scheme makes this card perfect for any occasion.


Laura created a cute little Valentine by stamping the two panda bears kissing each other.


Nichol created a single layer card showcasing a cute panda holding a bunch of heart shaped balloons. A simple stamped sentiment in black finishes this sweet love-themed card.


Emily used Pandamonium and Landscape Trio Creative Cuts to create a Christmas card for her son. Santa's hat and a gift from Cozy Christmas, plus a sentiment from Believe In Magic complete this adorable little scene.


12.16.2013

STAMP HIGHLIGHT: LOVE FROM ABOVE

Today we start our first day of Stamp Highlights with Love from Above. Since we received so much love for our Sagittarius girl from "Cosmic Stars" we wanted to continue from there and create another set for you! So we put our heads into the clouds and came up with these cute cupids, cherubs and angels! 


This week we have our Challenge Winner and Guest Designer, Jen Rzasa join us for Stamp Highlights. I just love what Jen and our Design Team have created.

Jen did some black and white Copic coloring. This was her first time attempting the technique, and thought it was a lot of fun!  She also added a sweet little heart to tie in with the heart at the end of Cupid's arrow.


Jenn created a little cloud scene with cupid and the angel. A little pop tape and glitter finishes off this angelic valentine.


 Emily created a clean and simple card using the open cloud with the angel stamped into it with no masking required. The sponged, floral Femme Frames softly frame the image and sentiment.


Laura embellished a pillow box. She started by die cutting some pattern paper using our tag dies. Then, she used the cloud to stamp her sentiment on and fussy cut out one of the cute little angels.


JJ created a sweet encouragement card with this set. A little angel sits atop a puffy cloud that is showering love.