Welcome to the kick off our of September soft release. Here at the ME headquarters, we're gearing up for our mega birthday release in October so we've been busy, busy, busy! I'm handing over the First Looks reins to our Design Team this month and you know they're gonna knock your socks off! We are releasing 7 new Creative Cuts, 5 of which coordinates with previously released stamp sets. These were all highly requested by you! Completely new are two stand alone Creative Cuts, one of which will be making its debut today!
This is a FIRST LOOK post. New products shown here will be available for purchase September 15th at 12:00AM EST.
Hello! Nichol here today with a Designer Series card and video showcasing the brand new Peek A Frame Creative Cuts Dies.
I know it's hard to believe but Christmas is only about 3 1/2 months away! If you're like me, you have to get started on your cards early as there's no time once the holiday season rolls around!
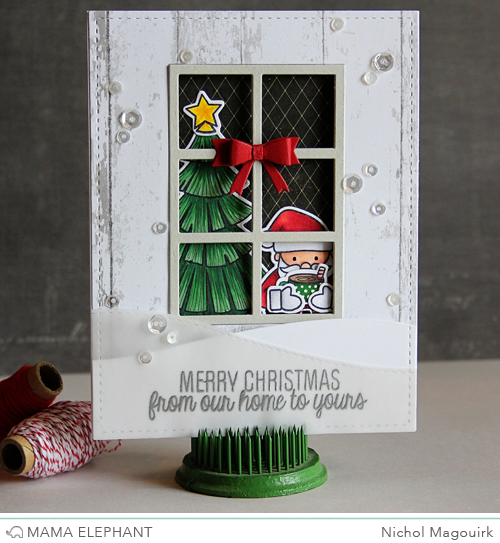
For my card share today, I created a "window" Christmas scene that "peeks" into the inside of the card. I used three of the four dies from the Peek A Frame Creative Cuts Collection and paired them with the Cozy Christmas Stamp Set, new coordinating Cozy Christmas Creative Cuts Dies, the Landscape Trio Creative Cuts Dies and the Dainty Bow Creative Cuts Dies.
I cut the front of the "house" from woodgrain patterned paper using the largest Peek A Frame Creative Cuts die (the stitched rectangle). This die measures 5 1/2" x 4 1/4" and fit the front of an A2 card perfectly!
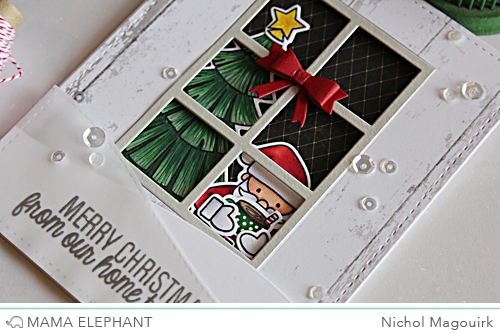
I cut the window die from the inside of the stitched rectangle to make a "window" for my house. I wanted the window frame to be a different color than the house but not take away from the colorful accents inside the card so I cut this design again from some light gray cardstock and simply trimmed the one side that scores using my paper trimmer. Then I glued the window frame in place over the "house" panel.
I die cut the Dainty Bow Creative Cuts die from some red cardstock, assembled the bow and adhered it to the window on the outside of the card.
To create the snow drifts along the bottom edge, I die cut some white cardstock and vellum using the largest stitched rectangle Peek A Frame Creative Cuts die, then used the Landscape Trio Creative Cuts dies along one edge. I popped the white cardstock "snow drift" up along the bottom edge using foam adhesive. I stamped the greeting from the Cozy Christmas Stamp Set on the vellum "snow drift" using Versamark Ink and heat embossed the image with silver embossing powder. I adhered the vellum piece by hiding some liquid adhesive behind the embossed areas on the strip.
To finish the front of the card, I glued sequins randomly to look like snowflakes.
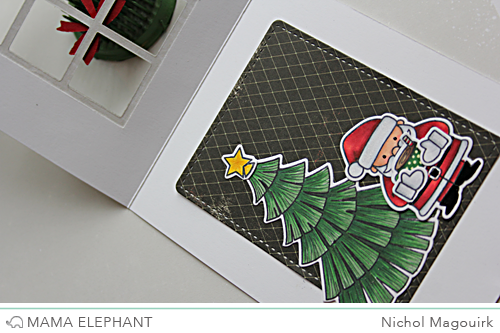
For the inside of the card, I die cut some patterned paper using the rounded corners stitched rectangles die from the Peek A Frame Creative Cuts Collection. I stamped the Cozy Christmas images on smooth white cardstock, colored them in with Copic Markers, and then die cut them with the new coordinating Cozy Christmas Creative Cuts dies.
I assembled the die cut images inside the card to show through the window on the outside.
Click the video below to see how I put this card together step-by-step or click HERE to watch it on YouTube.
The Peek A Frame Creative Cuts Dies are so versatile and are a great addition to your collection of die cutting basics! Thanks for spending part of your day with me!


Love the peek-a-boo window frame!!
ReplyDeleteAh-dorable!! I just love everything about this card and I am super excited about the new dies! :)
ReplyDeleteSuch a cute card. I cannot wait for these dies.
ReplyDeleteThis is soooo CUTE!!! LOVE!
ReplyDeleteSo adorable!! Really love the window die!
ReplyDeleteThis card is absolutely adorable! Love the new die!!
ReplyDeleteThis is such a cute card! I love all the layers.
ReplyDeleteSo awesome! I can't wait!
ReplyDeleteGreat card, video, and products! I would love these dies! Can't wait for the release day!
ReplyDeleteVery cute! I love the Peek a Frame.
ReplyDeleteI can't wait to get my hands on this!!!
ReplyDeleteLooks like another great product from Mama Elephant. Love the pick a boo die. Your card did a wonderful job showing it off.
ReplyDeleteSuch a darling card! The writing is on the wall...my wallet is gonna take a hit this time, for sure!
ReplyDeleteSo sweet! Love it!
ReplyDeleteWhat an adorable card!
ReplyDeleteIncredible card!!!!
ReplyDeleteSo cute
ReplyDelete