Image Map

5.31.2021

Slim Scenescape Builder with Megan


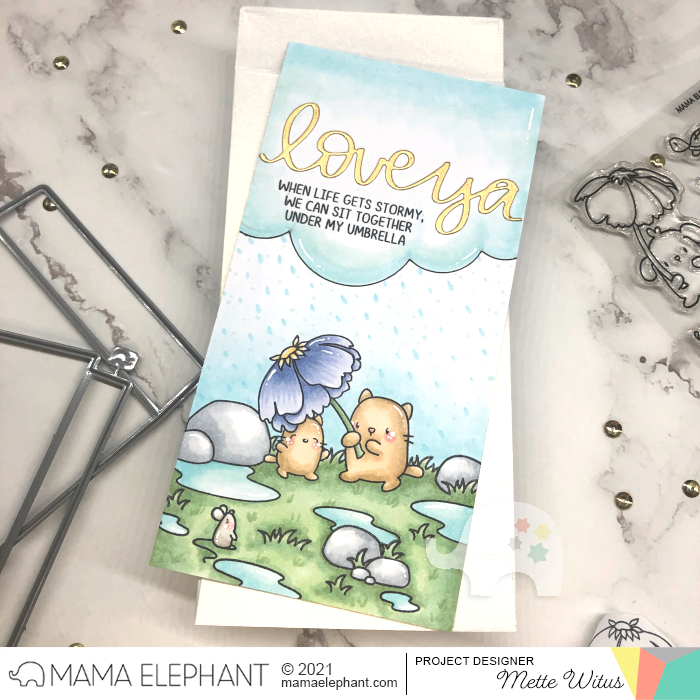
Welcome to the Mama Elephant Blog! This is Megan and it is always a delight to be here! The end of the school year is drawing near and it has really been a doozy for so many of us. Teachers have worked especially hard this year and under such trying circumstances. What better way to thank these special people than to give them a handmade token of appreciation? With that in mind, I made this fun Slim Scenescape card to share with you today. 

I began by stamping images from School Rules, Book Work, Piñata Party, and Crafted With Love in a warm chocolate hybrid ink onto white cardstock. I then colored the images using Copic Markers and die cut them out using the coordinating creative cuts.


I wanted to create the feel of an old school classroom with wood floors and a green chalkboard. I die cut the stitched building pieces for the Slim Scenescape Builder from a light blue green cardstock and inked the edges with Evergreen Bough Distress Ink. Once the ink had time to dry, I used an anti static powder tool to prep the front panels and heat embossed the sentiments in white. I usually use a microfiber cloth to buff the excess powder off after the embossing powder melts; however, I really liked the chalky look that it gave to the panels for the chalkboard.

After constructing the Slim Scenescape, I added the images using liquid glue and glue dots. To give the images more stability, I die cut each image a second time from plain white cardstock and layered those behind the colored ones using liquid glue. This extra step doesn't take long and really helps to hold the images in place nicely.

Thank you so much for spending time with us today! I am so glad that you stopped by and hope that you enjoyed yourself! I have listed and linked the products that I used below to the Mama Elephant Shop for your convenience. Have a great day!

Mama Elephant Products Used:


5.28.2021

Little Unicorn Agenda with Vera

Hi, there! It's Vera here today and I'll be sharing my project with you featuring the Mama Elephant Little Unicorn Agenda and Mixed Wishes Greetings

For the first project, I'm using the Little Unicorn Agenda stamp set. Here I paired with Slim Scenescape Builder - Creative Cuts and Slim Scenescape Rainbow Add - Creative Cuts. And here is the supplies list that I'm using to create this 3D Slim Scenescape Box.


All image was stamped on Bristol paper and colored with Copic markers. I die-cut the rainbow on Bristol paper too and colored it with Copics. The sentiment on Puffy Cloud is from  Mixed Wishes Greetings and the other is from Easy Sentiments that I white heat embossed on blue card stock.


For the second project, I'm focusing on the Mixed Wishes Greetings stamp set. 


FYI, the tiny hearts :hearts: :hearts: :hearts: :hearts: in this card are from a part of Sugar Cookies - Creative Cuts. All sentiments are from the Mixed Wishes Greetings stamp set except "to you with love" is from the Mixed Holiday Greetings stamp set. 


Thank you for joining me, I hope you enjoy today's inspiration, and see you next time!

Xo,

Vera

5.26.2021

Flower Shower with Keeway

Hello friends! It's Keeway and I'm here today to share some tag inspirations with the Flower Shower stamp set!

The images in th Flower Shower stamp set is the absolute cutest. I have been in a rainbow kick this month and I thought to myself, why not color all the flower petals rainbow as well! I love how fun and happy it all came out. I then used the Flower Shower creative cuts to die cut each of the images out.

I used the Cloud Nine creative cuts to create this cloud shaped shaker cards. I cut the frame and just the outer frame for the background out of white card stock. I heat embossed each of them with a sentiment from Mixed Wishes Greetings in silver and also ink blended the background Salvaged Patina distress oxide ink.

I added various iridescent and soft colored sequins into the shaker mix. I die cut the cloud frame from Cloud Nine creative cuts out of fun foam to create the dimension needed for the shaker. I sealed it up with acetate that was die cut with the outer cloud frame and lastly added my colored image to the front with foam tape.

Aren't they just adorable? I hope you enjoy today's inspiration and have a lovely rest of your week!

5.24.2021

Little Unicorn Agenda with Thi

Thi here and today I am sharing a clean and simple shaker card I made for my Mama Elephant Designer Series project. When I saw these sweet little unicorns from Little Unicorn Agenda stamp set, I knew I wanted to pair it with the Star Grid Cover - CC die. And it turned out just as magical as I imagined!

I started by coloring the unicorns in Copic markers, then I die cut them with their coordinating dies.

Next, I started building my shaker card by die cutting the Star Grid Cover - CC 5 times - once on purple card stock and 4 times on white card stock. To build up the shaker wells, I glued the following pieces in this order: purple star grid die cut, acetate, and the 4 white star grid die cuts. Then I filled each of the star wells with a fun star confetti mix.

To finish the card base, I adhered an A2 top-folding card base directly on top of the shaker wells. Next, I adhered each of my unicorns onto the card base with foam tape for dimension.

For the sentiment, I decided to not put something in the front to keep the focus on the sweet images and the fun shaker stars - so instead, I stamped a sentiment from Mixed Wishes Greeting stamp set inside and added one of the unicorn images from Little Unicorn Agenda as well to keep it cohesive inside and out.

And that's it! My card is finished. I hope you all like my card as much as I do and as always, thank you for reading!

5.21.2021

Flower Shower with Mette

Hello! Mette Witus here today with a cute mini slim card featuring the new Flower Shower stamps – Joined by a Little Cat Agenda friend under the umbrella.

Mette Witus Designer Series, May 2021

I started the card off by cutting a piece of white cardstock to 6 1/8 x 3 ½ inch and made a card base to match (7” x 6 1/8” scored at 3 ½ on the 7” side).

Mette Witus Designer Series, May 2021

Then I found the stamps I wanted to use to create my little puddle scene and laid them out.

I used the following sets:

  • Flower Shower for the big cat and the stamped sentiment
  • Little Cat Agenda for the little cat
  • Love Ya Script CC for the die cut sentiment
  • Ella & Friends for the Mouse and pile of stones
  • Mermaid Kisses for the bigger stones
  • Pix’s Favorites for the grass.
  • I also used a die cut cloud border from Slim Card Basics to draw in the cloud border under the sentiments using a copic safe fineliner.

    Mette Witus Designer Series, May 2021

    Before I even started stamping out the scene, I made my masks – on the photo above you can see how many masks I used, which were mainly the cats and the stones.

    Since I already had my masks ready before stamping, putting together the little scene was rather quick – just be careful to remember to place the masks before stamping (I might have had to start over once because I forgot a mask)

    Mette Witus Designer Series, May 2021

    I colored in the scene with my copics, adding the rain drops by making dots with the brush marker at an angle. Then I glued it to my card base.

    For the sentiment, I cut out the Love Ya Script CC using some gold cardstock and glued it to the card. If you want a true one layer card, you can simply choose a different sentiment.

    Mette Witus Designer Series, May 2021

    Finally, I used the Money Envelope CC to create an envelope that perfectly fits the card.

    Mette Witus Designer Series, May 2021

    Mama Elephant Supplies:

    Flower Shower Stamps & Dies

    Little Cat Agenda Stamps & Dies

    Ella & Friends Stamps & Dies

    Pix's Favorites Stamps & Dies

    Mermaid Kisses Stamps & Dies

    Money Envelope Creative Cuts

    5.20.2021

    STAMP HIGHLIGHT: Urban City

    Hi everyone! Welcome back to our 4th day of Stamp Highlights! Today we are featuring the new Urban City stamp set. We just love how this stamp can be used as a focal point or a light background!


    Jennifer embossed the Urban City stamp set on a distressed card stock and created a simple and suggestive card.


    Thi embossed and watercolored Urban City to make the sweetest card to send a friend. She added images from Little Boy Agenda and Little Girl Agenda to add a little more interest and fun to this card.


    For this Urban City card, Vera paired the stamp set with the Let's Chat - Creative Cuts.


    Maria create a super sweet night scene with the Urban City Stamp Set in combination with the Wish Upon The Stars Stamp Set and Creative Cuts. Magical!


    We love the way that Megan used Urban City to create this superhero design! The subtle stamping and ink blending provide the perfect backdrop for these caped crusaders from Little Superhero Agenda.


    Mette stamped the Urban City scene and used matching copic colors to create a subtle background to really make the Whimsy Alpha Creative Cuts sentiment stand out


    Keeway used the Urban City to create a colorful backdrop, combining images and sentiment from Happy Mail.

    5.19.2021

    STAMP HIGHLIGHT: Flower Shower

    Welcome back to another day of Stamp Highlights! Today the Design Team is featuring the new Flower Shower stamp set! Rain or Shine, these little guys are ready for anything!


    Love this sweet card by Vera, she paired the Flower Shower with Rolling Waves Cover - Creative Cuts.


    Megan used Flower Shower to create this awesome Mega Flipper card. The brightly colored florals give such a beautiful contrast to the stormy sky in the scene.


    Keeway used the Slim Scenescape Builder to put together a sweet rainy day scene with critters from the Flower Shower set.


    Maria create an adorable slim line scene with the Flower Shower Stamp Set and Creative Cuts


    Mette created a tag card using the Flower Shower stamps and combined it with the Leafy Cover Creative Cuts


    Jennifer created a clean and simple card with a delicate and wonderful no-line coloring, using the Flower Shower stamp set.


    We love this sweet and serene scene Thi made with our Flower Shower critters and sentiment. The watercolor rain is such a fun technique!

    5.18.2021

    STAMP HIGHLIGHT: Mixed Wishes Greetings

    Hi! Welcome back for another day of Stamp Highlights! Today our team is featuring these new happy sentiments from the Mixed Wishes Greetings stamp set! I love how you can use these in the narrower spaces!

    Megan made two cards using Mixed Wishes Greetings and Little Unicorn Agenda and they're simply magical! Mixed Wishes Greetings works perfectly with so many of Mama Elephant's other products. She added elements from Unicorns and Rainbows, Snow Globe Bitties, Cosmic Sayings, Fortune Envelope - Creative Cuts, and Rainbow High - Creative Cuts to create these designs and they are so much fun!


    Thi made a fun and sweet shaker card with Mixed Wishes Greetings, Little Unicorn Agenda and Cloud Grid Cover - Creative Cuts - all from this month's release!


    Mette used the Mixed Wishes Greetings stamps in the balloon from the previously released Carried Away Stamps. She added the balloon to a scene built using Slim Scenescape Builder , Slim Secenescape Rainbow Add Creative Cuts.


    To highlight all the sentiments from the Mixed Wishes Greetings Stamp Set, Maria heat white embossed them and ink blended an ombre background from dark to light pink. She cut out a Circle with the Stacked Circles Creative Cuts and added some characters from the Flower Shower and the Little Chickie Agenda Stamp Sets.


    What a darling card by Vera! She used the Zodiac Tiger and the Little Cat Agenda stamp set to pair up with the Mixed Wishes Greetings stamp set.
    She used the Balloons from Slim Scenescape Rainbow Add and frame from Oval Deco Frame - Creative Cuts.


    Jennifer realized some mini-card using the Mixed Wishes Greetings stamp set. Aren't they delicious?

    5.17.2021

    STAMP HIGHLIGHT : Little Unicorn Agenda

    Hi everyone! Welcome to day one of Stamp Highlights! Today we will be featuring projects created by our super creative Design Team using the new Little Unicorn Agenda stamp set! 


    Keeway color coordinated the Quick Stripes with her Little Unicorn Agenda, assembled together with the Cloud Grid Cover Creative Cuts.


    Megan paired Little Unicorn Agenda and Mixed Wishes Greetings with the Matchbox Builder - Creative Cuts to make this enchanting interactive design. She added in one of the fairies from Unicorns and Rainbows and stars from Little Agenda Spaceship to complete the scene. We just love it!


    Vera paired the Little Unicorn Agenda with the new Cloud Grid Cover - Creative Cuts to make this sweet card. She added the stars images from Unicorns and Rainbow stamp set and sentiment from the Mini Messages stamp set


    Jennifer created a little colorful scene using the Little Unicorn Agenda stamp set.


    Mette used the Cloud Grid Cover Creative Cuts to create a rainbow shaker card to go with the happy Little Unicorn Agenda, with the cake, rainbow and sentiment from the previously released Unicorns and Rainbows stamp set.


    Alberto used the new Little Unicorn Agenda stamp set combined with the previously released stamp set called Unicorns and Rainbows to create his magical scene!


    Maria created two magical projects using the Little Unicorn Agenda Stamp Set and Creative Cuts. She paired these cuties with the Slim Scenescape Builder Creative Cuts, the Slim Scenescape Rainbow Add and some clouds from the Wish Upon A Star Stamp Set. A girls dream!