Image Map

10.31.2013

Designer Series: Ornaments + Toys with Nichol Magouirk (and a video!)

It's Nichol Magouirk here today to share a new card created with the Remember December Stamp Set. I love the simplicity of single layer cards and the adorable text circles in this stamp set lend themselves to creating perfect hanging "ornaments" on this easy-to-create card.

Nichol_DesignerSeries_RememberDecember

When I'm creating a single layer card, I like to add small touches with glaze or glitter pens for a dimensional look and texture without any bulk of additional embellishments. This also makes this an easy to duplicate card if you have a lot to make!

Here's a quick video I put together showing how I created my card:


I also have a new card share featuring the Toy Shop Stamp Set. To be honest, this card was a struggle for me. I made about 8 different versions and this is the one I ended up going with. It's not my favorite card ever but that happens to everyone, right? ;)

I embossed the images with gold embossing powder and adorned the toy store with gems, sequins and a paper bow made with the Mama Elephant Dainty Bow Creative Cuts. I die cut and matted the whole thing using the ME Femme Frames.

Nichol_ToyShop

I hope you've enjoyed these holiday cards! Thanks for stopping by today!

10.30.2013

Designer Series: Holiday Cards with Pearl Lui-Chan

Hello! Pearl here, to share four cards that mixes this month's releases with some Mama Elephant originals from last year. This is perfect for ME fans who may already have a few of last year's favorites. I wanted to show you how to get more mileage out of your stamps.

Let's start off with a card mixing the Santa Clause and Christmas tree image from Cozy Christmas with sentiment banners from Polar Pals. I love the tree image from Cozy Christmas because you can decorate it however you want as I did here using the sentiment banners from Polar Pals to trim the Christmas tree. I also added a subtle bokeh effect with a combination of sunshine, orangeade, and bubblegum dots as tree lights. The Copic-colored Santa brings the whole scene together on this card.


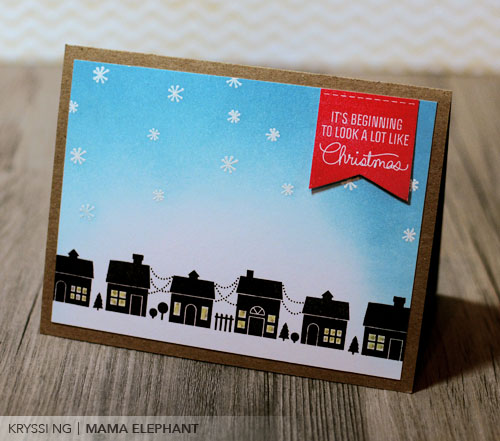
The next card uses the Feliz Navidad sentiment from Merry Greetings with house images from Full House and snow globe images from Believe in Magic. To create this card, I stamped the snow globe image from Believe in Magic and cut out the middle so that the scenery peeks underneath. I stamped a faint background of houses from Full House, starry sky and reindeer from Believe in Magic, and created a turquoise-distressed sky. Lastly, I added sparkle and shine with sequins and glitter. As you can see, Merry Greetings is a real must-have set for the holidays because the sentiments can be used for all of your holiday greeting needs.


I decided to create a Thanksgiving card to kick off the holiday season. The birch tree and deer images from Winter Wonderland are perfect for creating a wintery scene or an autumn scene as scene here. I stamped the deer, a cute little bird sitting quietly on it, and two birch trees on a tag created using the Embellished Tags die. I absolutely love this die because it can be used to create the perfect tag for card making, scrapbooking, or just as a gift tag. I then created a birch tree background and layered the tag over some tissue paper leaves that was washed with glitter paint and sprinkled with sequins. Lastly, I use the Bold Banner die to create a vellum label and stamped the "warm holiday wishes' sentiment from Polar Pals.


Finally, I created a card that combines the star balloon, tassel, and "yay" sentiment string from Party Kit with the bear and giraffe images from Nursery Decor. I used ME ocean ink and ME apple ink for the balloon and tassel, then further colored them with Copic markers just as I did with the stuffed teddy bear and giraffe. Oh and did you notice the little bow-tie on the teddy using the bow image from Party Kit? To give this clean and simple card a bit of dimension, I added shiny Glossy Accents to the balloon and stitched the edges.


As you can see, the new Mama Elephant stamp sets are very versatile and can be mixed with older sets for even more variety so you can be sure that you get optimal mileage out of your stamps!

Hope you enjoyed these cards!


10.29.2013

Designer Series: Toy Shop cuteness with Emily Leiphart

It's Emily Leiphart here today and I'm sharing two cards using the new release Toy Shop. In both cards, I used the buildings to create backgrounds and I love how they highlight the images even though I've left them uncoloured.


This first card uses the same base as explained in this Thanksgiving card where I used the scallop rectangle from Femme Frames with a vellum layer as the base of the card. I share the scoring technique in this video tutorial. I put the Gemini twins from Cosmic Stars on centre stage and stamped a sentiment from Merry Greetings. I also used the Dainty Bow die. We know two families with boy/girl twins who would love this card!


I gave my second card a completely different look using the same building stamp from Toy Shop as the background. I masked the building and stamped two side sections, creating a bridge where one would go to see Santa at the mall.


I masked the Virgo from Cosmic Stars and stamped Santa behind her, coloured them and fussy cut them as one image. Then I popped them into the card with foam tape. For the sentiment, I die cut the Bold Banner, stamped the sentiment from Toy Shop and sponged the edges. To give the banner shape, I folded the ends down and taped them flat against the back, then popped up the centre with foam tape.


I hope I've inspired you to play with your October Release goodies from Mama Elephant! In case you were waiting on sold out items, the Femme Frames dies have now been restocked. ;)

Thanks so much for stopping by today!

PS! There's still time to enter the Studio Calico + ME Cinnamon Spice kit giveaway!

10.28.2013

Studio Calico + ME Cinnamon Spice Giveaway

We've got a little something special for you today in partner with our friends at Studio Calico. We designed the exclusive stamp set for the sold out Cinnamon Spice add-on kit, but luckily you can win it right here!


You have seen some of our designers feature the kits over at the Studio Calico blog last week. In case you missed it, the links are HERE, HERE, and HERE.

I made 3 cards using the exclusive stamp set along with bits and pieces included in the kits. You've got a great, classic image of the row of holiday homes. Aren't the string of lights the cutest? We included several different options of sentiments that finishes your cards in a jiffy, which is key when you're making a lot of cards for the holidays! I love the embellishments included in the kits, lots of neutrals with just the right pops of color!

First card, I used a piece of patterned paper from the 6x6 paper pad included in the main kit. The cascading stars are just perfect. I die cut it using Femme Frames (psst! they're back in stock!) I paper pieced the banner part of the sentiment. So quick and easy!


Next card, I used the kraft card base included in the kit. I first stamped the snowflakes with versamark ink and embossed them in white. Then I took out my distress inks in Tumbled Glass and Spun Sugar and created the gradient sky. I stamped the houses and colored the windows in with a light yellow Copic marker and added some sparkle to them with a glitter pen. I stamped the banner sentiment with our new Apple pigment ink and just cut out and adhered. 


Last, I decided to use the single tree image included in the stamp set and create a forest with our Mojito pigment ink. I also stamped and cut out a single house and stacked them together. The speech bubble and sentiment is also part of the stamp set. The black stars and grey twine are part of the kit.


GIVEAWAY TIME! Studio Calico is generously giving away the Cuppa Card kit and the Cinnamon Spice add-on kit which includes the exclusive stamp set I used above to one lucky winner! 

Just leave a comment and if you haven't done so already like us on Facebook -- I'll pick a winner on Wednesday 10/30!

Anddddd because our Team is so awesome, they worked overtime and through the weekend to provide you with more eye candy using the SC kits!


I'm serious, we really worked their behinds off this crazy month! :) Be sure to check them out and leave some virtual hugs!

10.25.2013

Designer Series: Winter Wonderland with Jenn Biederman!

Nichol is featured on the Studio Calico blog today using ME's exclusive stamp set once again! Be sure to pop on over and leave some love. :)


Morning! Jenn, here, and today I would like to share a card and video showing how to create a slide out message. This is such a fun way to make your card interactive! The Winter Wonderland set worked well for this type of card.

JennB_WinterWonderlandCard_DS

The "mama" deer is slightly lifted to allow the recipient to pull out a special message.

JennB_WinterWonderlandCard_DS_detail

Here's a video showing how I put this card together. I am not an expert at making videos, so it's a bit amateurish, and there's a point in the video where it sounds like a bird is chirping. LOL...I don't have a bird. ;-)


Catch you later!

10.24.2013

Designer Series: Cozy Christmas with Laura Bassen

Hola! Take a peek over at the Studio Calico blog. Our girls are featuring the exclusive stamp set Mama Elephant designed for the Cinnamon Spice kit. :)


Today we begin a new feature here at the ME blog called the Designer Series. Designer Series will typically begin right after Stamp Highlights. I think we have truly phenomenal designers that are beyond talented when it comes to stamps and ink! We want to give all our designers their own days to shine right here! This gives them the exposure and opportunity to show of all their tips and tricks that you may have missed in the truncated Stamp Highlights posts. And it will allow all of us to get to know them better too. That's always a plus! :) So, you'll find lots of great personalities, tutorials, and videos that will really help you make the most of your ME stamps. We hope you enjoy this new feature!  The first designer up to bat is the ever so lovely Laura Bassen!


Hi everybody! Laura Bassen here and today I have a cute little treat bag to show you using the Cozy Christmas stamp set.

Mama Elephant~Cozy Christmas

I used an X-acto knife to trim Santa's mittens so that I could slip the present in. 

Mama Elephant~Cozy Christmas

Here's a video showing you how I created this simple little treat bag. 


Thanks so much for looking!

10.23.2013

STAMP HIGHLIGHT: TOY SHOP

Our girls are on the Studio Calico blog today! Head on over to peek at the exclusive stamp set Mama Elephant designed for their November add on kit - Cinnamon Spice.


One of the best things about the holidays is that we get to go back and reminiscence all the joys when we were children. And what was that magical place that always have a place in our hearts? The toy shop! This set is for the old, the young and for anyone who loves to have fun!


Toy Shop

Our Design Team sure had a lot of fun with this set!

What's Santa without his toys? JJ put together the toys of Toy Shop with the Santa of Cozy Christmas. Of course, Santa is making his list!


Jenn created a toy shop scene using the storefront, hanging sign, train and bicycle from this set. She masked off the train so that the bicycle appears to be behind it. After coloring the toys in the window with Copic markers, she added a little shine with her glitter brush. The store sign is angled away from the base to add emphasis.


Pearl created a scene with the toy shop front and layered in a pennant overlay as the store window. She accented the Copic-colored wooden facade with a wood grain pattern paper. On the inside of the card, she added colorful toys to finish the card.


Laura created two fun tags using the new tag die as well as topping them with the new dainty bows.


10.22.2013

STAMP HIGHLIGHT: MERRY GREETINGS

Today we have Merry Greetings for our Stamp Highlight. Mmm, nothing much to say but it's pretty much the best holiday sentiment stamp set you'll ever own! Heehee! Seriously though, we've had quite a few requests for more of my handwriting infused into our stamp designs, and you know, well.... I aim to please! So, there you have it, a festive sentiment set paired with a clean classic font.


Merry Greetings


Check out what our talented girls did with Merry Greetings! I am completely smittened!

Jenn had fun creating this card that also contains a "gift" tag. After stamping the "merry" greeting on the tag, she stamped it again onto one of the deer (stamped in Smoke) from the Winter Wonderland set. The sentiment is enhanced by adding foam tape to the deer and stamping the stars from this set. She finally sewed a clear pocket onto the base for the tag that will be a gift to the recipient.


Pearl created a layered card using the Creative Cuts Embellished Tag to make an opening so that the Winter Wonderland-decorated "joy to you and me" sentiment would peek colorfully underneath.


Laura used the bells from the Winter Wonderland set to create a festive garland with the sentiment from Merry Greeting nestled in.


Nichol created a trio (almost) one-layer cards featuring the greetings from the Merry Greetings Stamp Set combined with Winter Wonderland and Basic Borders. The design of these cards makes it easy to create multiples of the design quickly and easily and add variety by changing up the greeting for each recipient!
JJ paired the sentiment from Merry Greetings with the bright Christmas tree from Cozy Christmas. She made a custom-sized sentiment tag using the new stitched rectangle die from Femme Frames.
Emily stamped a sentiment from Merry Greetings on an angled panel die cut from Femme Frames and highlighted it with cascading sequins and glittery discs die cut with the hole enforcer from Embellished Tag.
Geralyn created a wintry background with some snowflake punches and the beautiful deer silhouettes from the Winter Wonderland set. This scene perfectly matches the sentiment from Merry Greetings.

10.21.2013

STAMP HIGHLIGHT: REMEMBER DECEMBER

We are back with another Stamp Highlight today. We created Remember December with PL and Scrapbookers in mind for some journaling. However as you will see from our Design Team, this stamp set does not fall short in creating cards at all! December is just around the corner, so let's celebrate, cherish and remember. This one is for you, December!


Remember December

Now lets see what our Design Team created, shall we?

Pearl was inspired by the perfect holiday sentiment circles and used them to make string lights with the help of the dotted line image from Party Kit and star images from Merry Greetings. She kept it clean and simple by finishing the card off with the beautiful calligraphy sentiment "celebrate the good times". 


Jenn created a CAS card using the cute sentiment circles from the Remember December set. She highlighted a couple of the circles by popping them up with foam tape and added glossy accents. The "joy" sentiment from the Merry Greetings added just the right touch.


Laura created a fun non-holiday card using many different elements from the Remember December set. She also used the tiny arrow die.


Nichol created a Christmas layout showcasing how easy it is to create a one-of-a-kind made-to-match journaling card that perfectly compliments her page. To add additional interest and emphasis to the design she stamped the different elements from Remember December, Bling and We Click in colorful Mama Elephant inks and embossed some of the words with gold and red embossing powders.


JJ used the script sentiments from Remember December to create a colorful bokeh Christmas card.


Emily used generation stamping to create a waterfall of numbers, highlighted by glittery triangle confetti die cut from the Embellished Tag accessories. The card is framed by negatives die cut with the scallop rectangle from Femme Frames.

10.18.2013

STAMP HIGHLIGHT: COZY CHRISTMAS

Today's Stamp Highlight feature is none other than Cozy Christmas. It's sort of on the opposite spectrum of what we showcased yesterday. :) If you can appreciate imagination and creativity, you can appreciate the thought and effort that went into designing this set. Angela really outdid herself with all the images here. Funny thing is she actually designed Mr and Mrs Claus last year when we were designing Polar Pals. She had come up with too many great images. I think the other characters will probably make their debut next year! Wait till you see them! (Sorry I just teased you guys for a whole year, hah! :)

I looooove the images here and so far every single project created with Cozy Christmas has been just absolutely cute and heartwarming -- which is awesome because that's just what we're after! I love that there are 3 different tree topper options, which are all so easy to line up! The extra mittens is great for layering all the cute objects you can place them in! I think you'll have loads of fun with this!


Cozy Christmas


Ready to do some serious smiling? Remember you can always check out the designer's blogs for more details on how they created their cards. Their links on on the sidebar to the left.

<-----  Look thataway! -----

Emily created a shaped card using Femme Frames to highlight this clean and simple 3D scene using Cozy Christmas. 


See how Emily did it in her video tutorial!


Pearl created a clean and simple, polka dot textured card to allow for Mr. & Mrs. Clause to really pop. She colored the images using Copics markers. To continue the clean aesthetics, she used the bottom of the tree image to create a ruffle garland to trim the top of the card and added the gift box image with a glittery bow to the raised sentiment banner.


Nichol stamped and colored the sweet images from Cozy Christmas with Copic Markers, cut them out and layered the images together to create this layered scene complete with a stamped and embossed greeting from this set and Remember December.


JJ paper pieced the Cozy Christmas tree in a rainbow of colors! The sentiment is from new set Merry Greetings!


10.17.2013

STAMP HIGHLIGHT: WINTER WONDERLAND

Welcome back, everyone! Thank you for making our celebration so amazing and so busy! We've been working around the clock packing your orders. You should all receive it really soon!

I would love to see what everyone ordered and created! If you're on Instagram, use the hashtag #mamaelephant so I can peep! :)

The first Stamp Highlight is Winter Wonderland, already a classic hit with ME fans! Beautiful, silhouette images paired with gorgeous, catchy sentiments. It's a must have for your holiday cards. My favorite? The skinny, elegant birch trees and those deers have my heart. Seriously!

Winter Wonderland

Now are you ready for our first Stamp Highlights post with our new Design Team? Hold onto your seats and try not to get blown away because they have all brought their A-game! I love our girls!

Nichol created a Winter Wonderland scene by stamping the trees with Versamark and embossing them with clear powder and using Distress Inks over the entire thing, resulting in beautifully resisted trees with a colorful background. She stamped the deer and birds with black ink and embossed the greeting with black glitter embossing powder. 


And here's the video Nichol created for the card:


Emily heat embossed the birch trees and sponged a sunset into the background of this scene which is highlighted by the Femme Frames dies. The scallop frame was die cut from crepe paper creating a light and airy feel.


Jenn had fun creating this winter scene using the new Smoke ink pad. She added a bit of texture by layering a page from an old book, wood veneer accents and the fun ME banner die. This card completely shimmers in the light.


Pearl created a soft watercolor card inspired by the lovely deers in the Winter Wonderland set. She clear embossed the deers and the birch trees, then applied a soft pink and purple watercolor background, then added gold stars to fill the sky, and wrapped it all up with the perfect "sparkle and shine" sentiment.


Laura created this simple winter scene. She used the new Winter ink pad on the birch trees.


Are they all fantastic? Like, every. single. one. of. them! I dare you not to be inspired! :)