Image Map

5.31.2014

June Release Sneak Peek Project!

I hope everyone is enjoying their weekend! I've got a sneak peek for those of you who stopped by today (thank you by the way!). I have sooo many special occasions coming up -- graduation, teacher year end gifts, bridal showers, birthday parties, and weddings -- it's really time for me to kick into high gear and really churn out some congratulatory themed cards and gifts! Or combine them and just give a gift card, lol, that's my specialty!

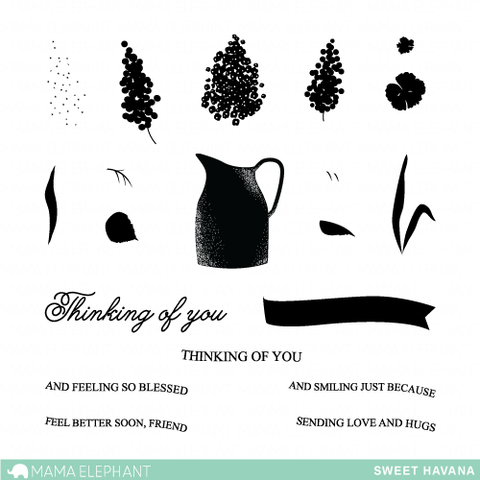
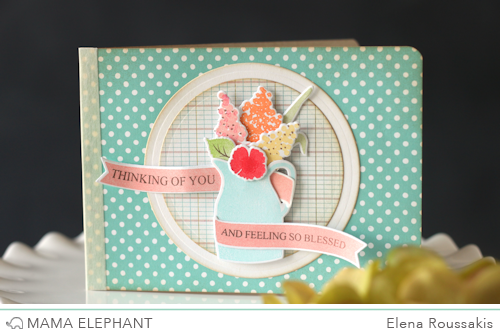
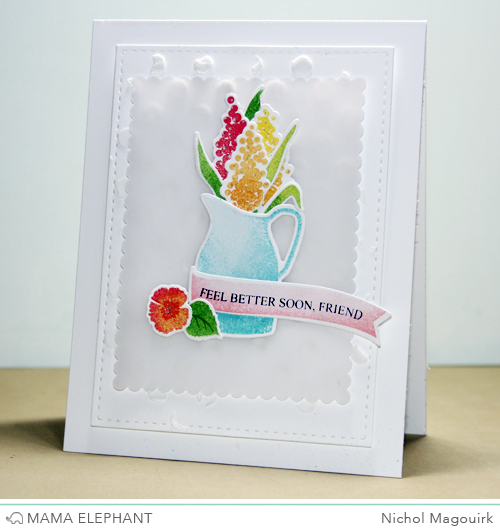
I've got a fun share with you using a brand new stamp set that will be released June 15th and it's really like... the perfect sentiment set for all those occasions I mentioned above. I plan to keep it on my desk permanently until September!

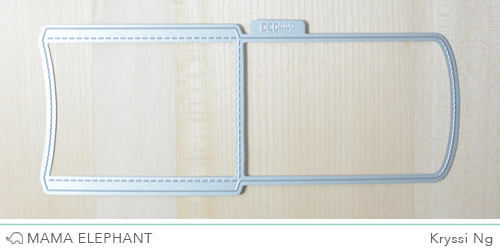
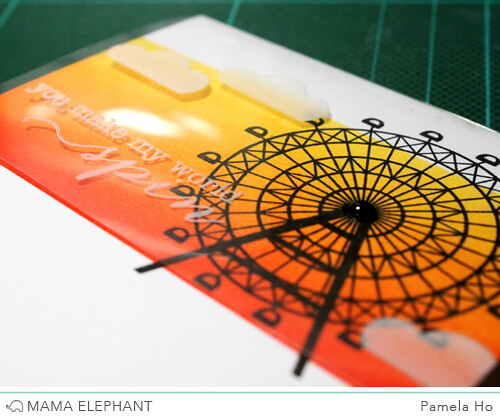
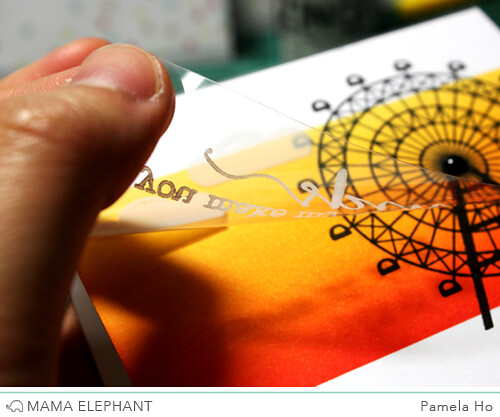
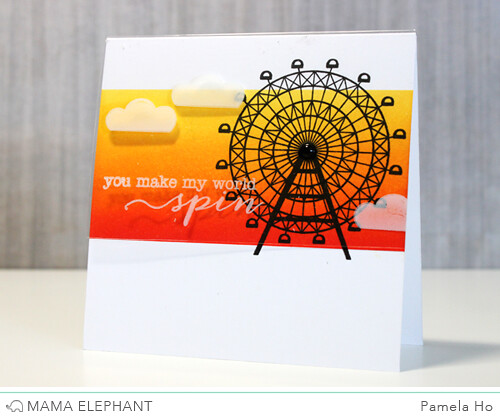
Here's a quick card using THIS perfect pocket from We R memory/Lifestyle Crafts. You need one of these, seriously. It's only $19.99 for a fairly large die and you get 20% off your entire purchase on the Shop We R site using code SUGAR. (You're welcomed! :)


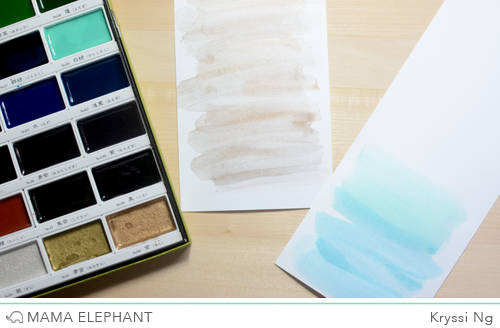
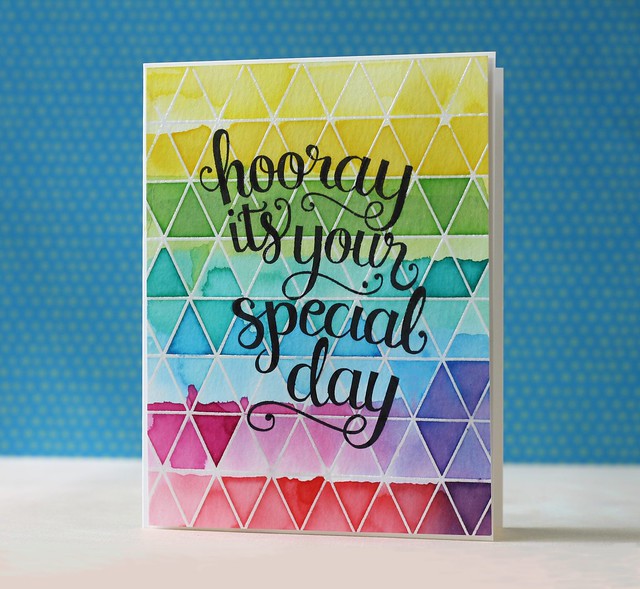
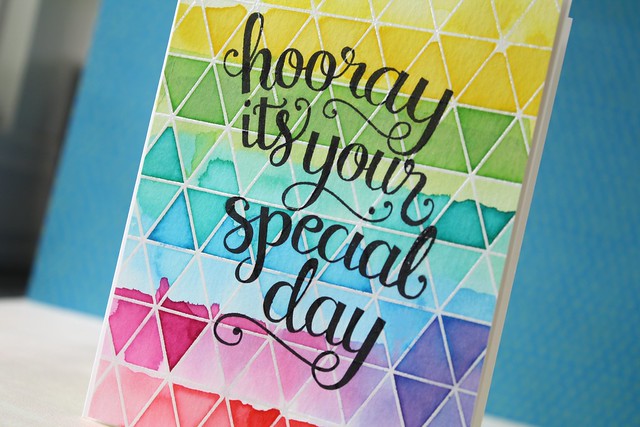
I watercolored two card bases not sure which one I plan to use yet. I am using the Gansai watercolors that we carry in our store. These are the best and easiest to use watercolors in my opinion... we love it so much that we decided to stock all the sets available:

the affordable 12 piece set
the step up 18 piece set
the nice range 24 piece set
and the newly stocked monster 36 piece set

I personally always go big or go home so I went with the 36 piece set. It has the addition of three metallic watercolors (shimmery white, gold, and copper) which the smaller sets do not have and they are just amazing for a watercolor medium. They shimmer and sparkle in person! I'm such a fan of these!


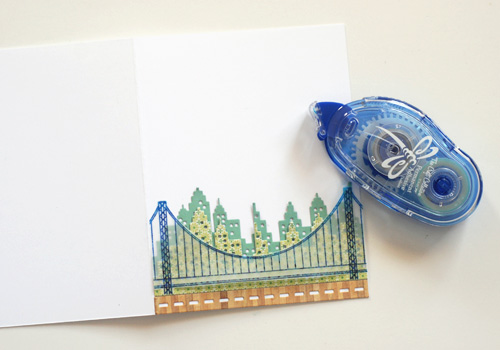
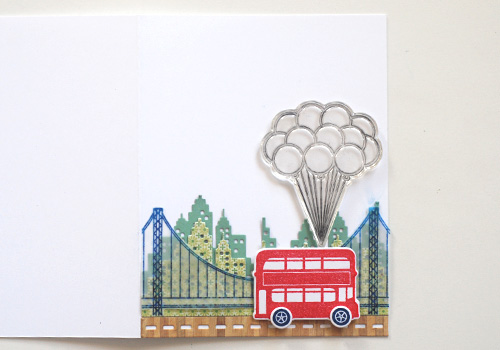
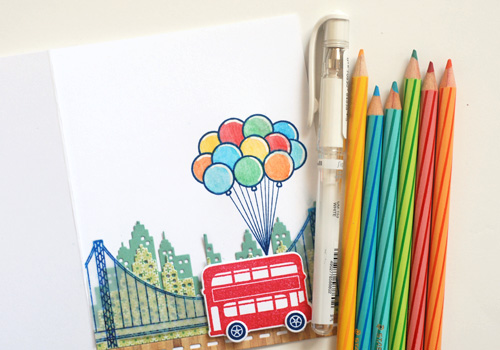
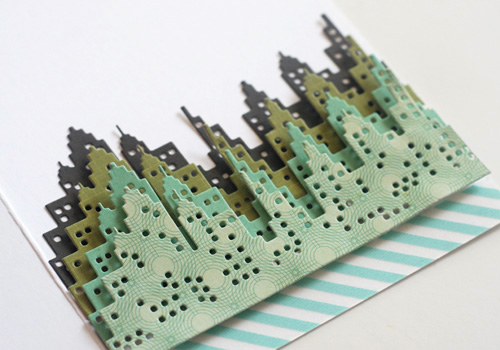
Okay, so I decided to go with the blue. This is what it looks like die-cut and assembled. Just a bit of glue along both sides and it's complete.
  

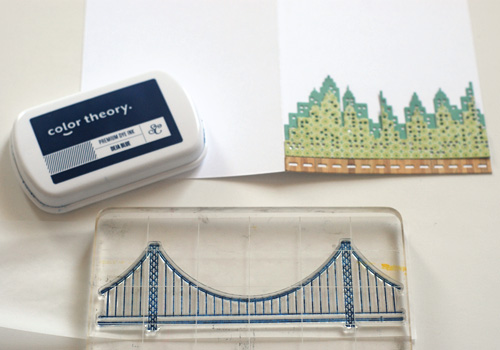
I chose the blue because the gift card was gold. The design you see right here is all stamping using the new set. Like it? :)


I'm so excited to start our countdown soon... 10 days! See you back here!

5.30.2014

DS: Sightseeing with Geralyn Sy!

Hi everyone! Geralyn here today to share with you my step-by-step process of putting together a card using the new Sightseeing stamps. Normally I'm a CAS cardmaker, but I wanted to try something different as well as use the stamp set for a card that's unrelated to travel.

I started by creating a cityscape scene with patterned paper using the new Cityscape creative cuts.


I stamped the bridge from Sightseeing onto vellum, and then I cut it out to overlay on top of my cityscape.


I added the cute double decker bus from Sightseeing to my scene with some foam adhesive. I wanted this to be a birthday card, so the balloons stamp from Up and Away was the perfect addition, so that it would look like they were being carried by the bus!


I colored in the balloons with my watercolor pencil crayons, and added a bit of detail with my white Uni-ball Signo pen.

At the top of the card, I decided to add a tab with a number 3 (cut out with the Inline Letters Creative Cut) since my nephew is turning 3 years old. The 'ready set go' stamp is from Sunny Skies.


Here's my completed card!


Hope you enjoyed this look into my cardmaking process. It was fun to do something different and make a more detailed card :) Have a great day!

5.29.2014

Sweet Havana with JJ Bolton!

Hi folks!  It's JJ stopping by the Mama Elephant blog with two cards that I made using the new set, Sweet Havana!  Sweet Havana is one of those fun sets that has lots of little images to build all kind of scenes.  And a few of the elements can be used to make 2-step images which is a look I absolutely love!  Here's my first try...


I started with die cutting the word "MOTHER" with my Inline Letters dies.  Using Post-It note label tape made it easy to keep my letter dies together and straight.  Then I stamped and die cut a bunch of flowers and leaves.  I didn't have a set arrangement, so I did a bunch of options in different colors.  I usually arrange them on the fly as opposed to planning it out beforehand.  Luckily, the open dies make it fast and easy to make a bunch of die cuts at one time.


When I applied them to my card, I varied the layers.  All together there are 4 layers: stamped onto the panel, glued to the panel, glued to the panel with foam tape, and reverse cut from the panel and backed with the stamped flower.  The card base itself is colored card stock that colors the reverse cut letters.  I wish you could see how beautiful these stamped images look in person!  The scripty "Thinking of you" sentiment is also in the Sweet Havana set.


I already had my letter dies together and a bunch of extra die cuts, so I thought I'd make another version of the first card.  This time, I added a vellum banner over part of the die cut word.  I just love these flowers!


I'm sure you'll be making your own floral arrangements soon with this one!  Thanks for stopping in!

Mahalo and Aloha,
jj

5.28.2014

Splendid with Laura Bassen

Hi everyone! It's Laura here, and I have a fun project to share using the new Splendid stamp set. I absolutely love the handwritten look of these sentiments!Mama Elephant~SplendidAfter I stamped my sentiment in black, I clear embossed the triangle background using the Trifecta stamp set onto watercolor cardstock. Then created the faux watercolor look by smushing distress inks with my acrylic block. Mama Elephant~SplendidHere's a quick, little video to show you how I did it: Thanks so much for watching!

5.27.2014

Around We Go with Pamela Ho!

Hello everyone! It's Pamela here for my first Designer Series post! Around We Go was one stamp set that really jumped out to me. There is just something magical about ferris wheels that I am in love with!
I started out by blending red, orange and yellow together to create a sunset background. Then I stamped the ferris wheel in black directly onto the blended background.

Mama Elephant - DS - Around We Go - 02

Then I stamped the clouds and the sentiment in white onto a piece of acetate and adhered it to the front of the card. I finished the card off with a small black enamel dot on the acetate to hide a little bit of adhesive.

Mama Elephant - DS - Around We Go - 01

Here is the completed card! I love the look of the white on the acetate! Just enough for you to read the sentiment, but just slightly opaque for the clouds to look more realistic.

Mama Elephant - DS - Around We Go

Hope you enjoyed reading through my card making process. I can't wait to see you guys do with this stamp set!

Sightseeing with Nichol Magouirk!

Welcome stamping friends! Nichol here today with a fun "scene" stamped card showcasing the brand new Sightseeing Stamp Set and coordinating Creative Cuts as well as the new Cityscape Creative Cuts dies.
I am a big fan of creating a "scene" for my handmade cards and Mama Elephant has such a great variety of stamps and dies that work well together to mix and match for one-of-a-kind scene cards!
Here are a few of my favorite go-to products to use when creating a scene:
  • vellum - it allows you to "see" through it giving the illusion of dimension without the bulk
  • ME Landscape Trio Creative Cuts dies allow you to create any number of landscapes whether it be grass, hills, clouds in the sky or waves for water like my card today
  • ME Femme Frames Creative Cuts dies can "frame up" a scene and give a beauitiful finished edge 
  • ME Type It Creative Cuts dies - the scallop frame in this set is another great option for layering with vellum and other ME Femme Frames Creative Cuts pieces
  • ME Cityscape Creative Cuts dies - this new die lends itself to all kinds of scene building styles!
  • ME Speech Trio Creative Cuts dies - another versatile set that can help build a scene as well as give a great "landing spot" for your sentiment
  • ME Sunny Skies Stamp Set - if you want to create the perfect sunny background, this stamp set is perfect. I love stamping a sunny sky and layering a piece of vellum over top before adding the rest of my "scene"
Nichol_Sightseeing

The paper layers for this scenery card:
  1. A2 white card
  2. 5.25" x 4" piece of cloud patterned paper
  3. ME Cityscape die cut from cardstock
  4. wave/water die cut from patterned paper using ME Landscape Trio Creative Cuts
  5. another wave/water die cut from a different patterned paper using ME Landscape Trio Creative Cuts
  6. vellum with stamped and embossed bridge from ME Sightseeing Stamp Set
  7. stamped and die cut bus and flags from ME Sightseeing Stamp Set + another wave/water die cut from a different patterned paper using ME Landscape Trio Creative Cuts
  8. final wave/water die cut from patterned paper using ME Landscape Trio Creative Cuts
Even with all the layers on this cards, it remains relatively flat making it easy to mail!

Nichol_Sightseeing_closeup

Here are a few links to additional Mama Elephant "scene" style cards I've created:
Thanks for hanging out with me today!

5.23.2014

DS: Cityscape with Geralyn Sy

Hi everyone! Geralyn here today with a card I made using the new Cityscape Creative Cut. I love this new metal die and can definitely see myself using it a lot for both scrapbooking and cards! Today I'll show you how I used it to create a sort of ombre cityscape scene for my card.

I started by cutting out several cityscape die-cuts from various patterned papers. I laid them on top of each other, from darkest to lightest, and adhered each layer with foam adhesive. I love how the foam adhesive adds a lot of dimension to the card. The bottom stripe is just a strip of washi tape.


I added the stamped banner to the bottom as my sentiment. It's from the Wanderlust set. To finish off the card, I wanted to decorate the sky a little with some clouds so I used the Sunny Skies set.


Here's my finished card! I kept it quite simple but the dimension from the cityscapes adds a lot of impact.


Thanks for visiting today! I can't wait to see what you all do with the Cityscape Creative Cut!

5.22.2014

Stamp Highlight : Sweet Havana

Today we end our May Stamp Highlights with Sweet Havana. Kryssi always had a knack when it comes to designing florals.  When I look at these, I can imagine the warm summer air in the garden that these were picked from. This sweet set also has a coordinating die, so it is very easy to arrange beautiful bouquets of flowers.


Elena made a sweet pitcher full of summer blooms. I love how she made the banner look longer, by cutting an extra piece and hiding it behind the pitcher!


Nichol used the Rock 'n' Roll technique with the ME pigment inks to give the pitcher, banner, florals and greenery stamped images more depth and dimension with multiple colors. She kept the emphasis on the brightly stamped elements with a simple layered white on white background using 


Laura used the Rock n' Roll technique to get her dimensional stamped flower arrangement.


Pamela put the flowers and leaves behind the banner for some dimensions to create an image of a bouquet that's perfect for Mother's Day!


Emily used the bridge from Sightseeing as art deco style wallpaper to highlight her vase of flowers. The small table, made by modifying the Femme Frames stitched panel, was watercolored for an antique wood look using Gansai watercolors.


5.21.2014

Stamp Highlight : Splendid

Today we are highlighting another set with beautiful hand lettering by Pauline Ibarra. Splendid is a great addition to Make a Wish for that special occasion! I must say it is awesomely splendid!


Splendid

Elena heat-embossed the sentiment in pink and added the frame from Today Was. I love the bow, and how it wraps around the frame. The stripes in the background were stamped with the solid stripe from Message Bands.


Pamela heat embossed the sentiment in white and did some masking and blending for a plaid background. We love the bold white against the colourful background!


Nichol masked off part of the Splendid sentiment to stamp part of the greeting in black ink, then she masked off those words and inked up the rest of the greetings with Distress Ink, spritzed it with water and stamped it on the watercolor paper for a soft watercolored look. She paired the greeting with stamped and die cut elements from Pandamonium and Landscape Trio to complete the design.


JJ created a fun birthday card using stamps from Splendid and Party Kit! I love the sentiment on that angled panel!


Emily's use of the 'Be Awesome' sentiment is perfect with the dancing pandas as an encouragement card for her son. Watch the video below to see how Emily combined two Pandamonium Creative Cuts to create a single panda die!


5.20.2014

Stamp Highlight: Sightseeing

Back from NSS and I'm completely pooped. So, just gonna make it quick and show the cards created by our Design Team for today's highlight of Sightseeing.

Pretty awesome set, isn't it? My fave is the bridge, so much fun, you can even stamp little lights onto them or just draw them in yourself.


JJ created a fun shaker card with the Sightseeing set! I love the way the bridge is stamped on the acetate to give it more depth!


Pamela made a night scene with the double decker and the bridge. The bridge and the snow was stamped on acetate and adhered with foam tape to create a slight shadow against the back.


The little critters from tree friends look extra cute in front of the bridge! Elena grounded her images with the sentiment banner up top, stamping the bridge onto the banner as well as the panel underneath.


Laura created a clean and simple card using the coordinating die cuts for the double-decker bus.


Geralyn created a cute little scene with the double-decker bus and bridge. She added some watercolor detail and handlettered the sentiment to finish the card. 


Emily created a graduation card for her son by creating a double-decker school bus. She accented the flag with a little heart to emphasis the two-colored sentiment and used the flag detail as exhaust. Cityscape and Femme Frames Creative Cuts complete the scene.

5.19.2014

Stamp Highlight: Around We Go!

Happy Monday! Today kicks off our Stamp Highlight series, where we feature/highlight a new stamp set everyday. Our Design Team is incredibly talented and versatile, it's always so much fun seeing all the different projects they come up with using the same stamp set!

Let's start off with Around We Go which also has a coordinating Creative Cuts set! Just a super fun, fun set with so many possibilities!


Laura created a fun carnival scene with colorful seats on the Ferris wheel, bright hot air balloons and rolling hills.


Elena's card is fun! With a ferris wheel that actually spins, how could it be anything but?


For her card, JJ shows the versatility of the stamps in Around We Go. She used the stamps to create a colorful graphic background! Don't you just love all the yummy Mama Elephant ink colors?


Nichol created a carnival scene outside "the big city" by placing the stamped and die cut ferris wheel from Around We Go in front and tucking layered die cut Cityscapes behind the rolling "hills" die cut using the Landscape Trio dies. A stamped greeting in multiple colors adds to the playful feeling.


Emily created a multi-layered scene with a colorful and sparkly ferris wheel as the focal point. Femme Frames and Landscape Trio Creative Cuts were also used to complete the scene. This card is sure to brighten someone's day.

5.15.2014

MAY RELEASE AND STAMPEDE


Welcome to the Mama Elephant Release Design Team blog hop!

Our newest release is now live and available for purchase in the store!


Since I was MIA the last two days, I'm back with two cards to make up for my absence! I used a bunch of our new products!

For my first card, I wanted to create an urban carnival scene. In the Summers, while driving home from Brooklyn, you can see a giant ferris wheel from afar while on the Belt Parkway. It always look really cool from the distance against the urban skyline while the sun is setting! Here I used the Gansai watercolors to paint the sky extremely carefully.


The skyline is created with our new Cityscape Creative Cuts die set that comes with both the skyline and a road! The ferris wheel is from Around We Go stamp set I colored in the seats with my Copic markers.

Up close you can definitely see the "whites" of clouds and the different shades of the blue sky. When using watercolors, it's important to go light and retain the whites. White space is such an important part of the watercoloring technique. It's almost too easy to go overboard and swash paint over every little space, but try not to! Use the white space to create depth and highlights.. or in my case, streaks of white clouds.


And now the inside, the sentiment is from the Splendid stamp set and the bridge is from the Sightseeing stamp set. They were both embossed in white for a pop!


My next card is super cool and moody even! I negative die cut a window for a frame from the smaller stitched die from Femme Frames Creative Cuts die set. I wanted to create a clear window to see through the inside. Sentiment is the Hello Script Creative Cuts die (back in stock next week) which I adhered onto the clear acetate with a bit of Glossy Accents.


Let's take a look at the inside, which is really the focus of this card. I whipped out my new Gansai watercolors again and this time I used a watercolor cardstock as my base. I created a night scene by slowly layering greys upon greys. You can see the color gradient from dark to light. The moon and subtle stars were hand painted using the Gansai watercolors as well.

For the skyline, I die cut the Cityscape Creative Cuts die set a few times and one final time using the road that is also part of this set.


There you have it, two cards that are pretty similar but evoke different feels. Day and night. :)


To celebrate the new release, Mama Elephant is giving away one of each of the new stamps released! Winners will be chosen at random from the collective blogs in the Stampede. Winners will be announced on the blog on the last Stamp Highlights day. You have up to 3 chances to qualify to win!

Just leave a separate comment for each!

» Leave a comment on this blog post «
» Like/share us on Facebook: facebook.com/mamaelephant «
» Follow/tweet us on Twitter: twitter.com/heymamaelephant «


Now let's get on with the Stampede! Visit these amazing designers for tons of inspiration using all our new goodies! Best of luck!