Image Map

7.31.2014

Bootastic with Emily!


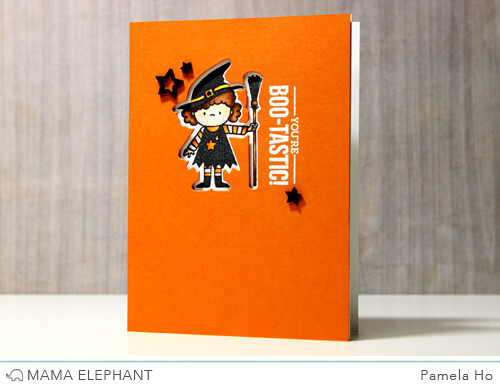
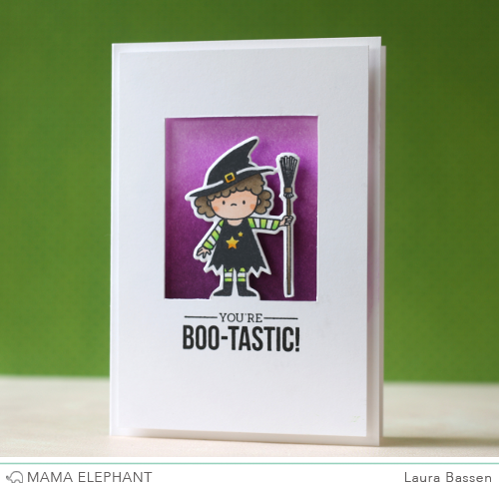
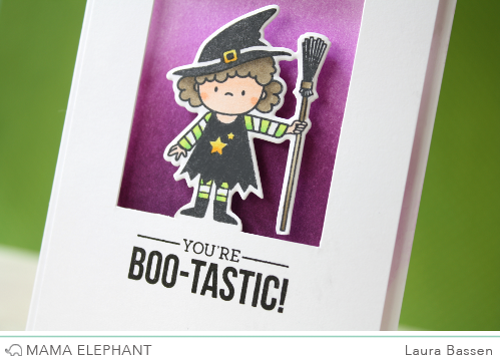
Hi, it's Emily and today I'm showcasing the Bootastic Creative Cuts which coordinates with the Bootastic stamp set.


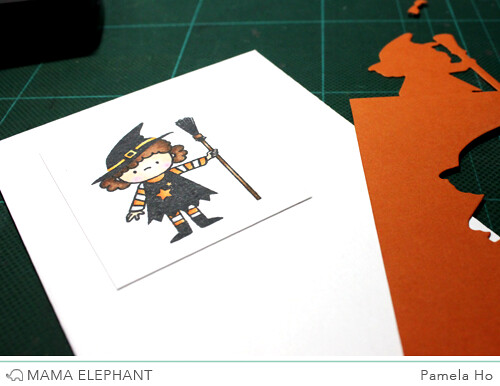
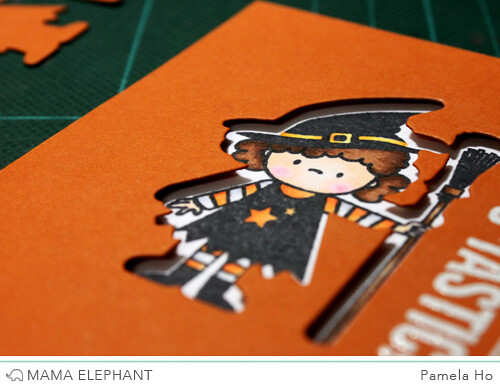
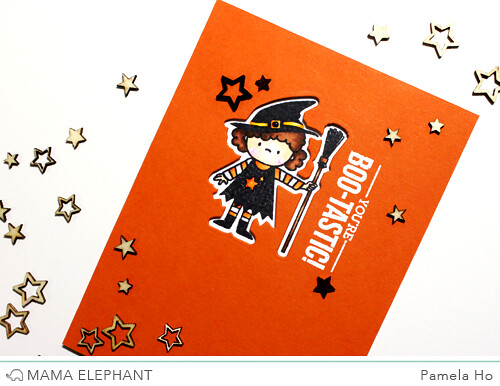
I loved this stamp set so much when it was released and I'm so excited that there are now matching dies. Bootastic Creative Cuts makes it easy to reproduce multiple images for all your Halloween treats!


I used the Embellished Tag Creative Cuts for the tag bases and I heat embossed the sentiment in black on all three tags.


My son appeared three times while I was shooting the video and, at the end, he'll tell you that the mummy is his favourite. ;)


Here's how I made the tags and attached them to the peek-a-boo zipper pouch bags:


Thanks so much for stopping by!

7.30.2014

Soiree with Nichol!

Hello everyone! Nichol here today with a Designer Series card share showcasing the brand new Soiree Creative Cuts dies. I created a bright and fun multi-layered birthday cake topped with some sweet little banners and finished with an embossed multi-colored greeting with the coordinating Soiree Stamp Set and Creative Cut dies.

Nichol_SoireeCreativeCuts

I embellished the cake layers using a bit of thin organza ribbon and circle sequins cut using the Confetti Creative Cuts die. I used a bit of Glossy Accents over the stamped and die cut cake stand to give it a "ceramic cake plate" look and topped the cake with the mini banner colored in with Copic Markers.

Nichol_SoireeCreativeCuts1 

I created my own plaid background using a border stamp from the Basic Borders Stamp Set on the die cut Index Card stitched rectangle. To keep the focus on the cake, I die cut the scalloped rectangle using the Index Card die and finished the edges by adding faux stitches with a white pen.

Nichol_SoireeCreativeCuts2

Want to see the step-by-step creation of this card? Please check out the video tutorial below: 


Thanks for spending part of your day with me!

7.29.2014

Bootastic with Pamela!

Do you have the Bootastic stamp set? Coordinating dies are here! No more fussy cutting and these dies will let you build an army of cute kids! This is Pamela on the blog with a card using the new Bootastic Creative Cuts.

 DS - Bootastic - 01

I used the cute witch from the stamp set and I die cut a window from a piece of orange cardstock. I then stamped the witch onto a piece of cardstock and coloured it with my copic markers.

 DS - Bootastic - 02

I then heat embossed the sentiment in white directly onto the orange cardstock. Using some foam adhesive, I adhered the orange to my card base.

DS - Bootastic - 03

Some wood veneer stars here and there and the card is finished. I love that bold white against the orange cardstock!

DS - Bootastic - 04

Be sure to come back later this week for more inspiration!

7.28.2014

Index Card CC with Laura!

Hi everyone! Laura Bassen here again, sharing a project featuring the new Index Card - Creative Cuts. This die set allows you to create the cutest little A1 size cards. I love this size. The speech bubble is also included in the set. After creating a speech bubble window, I blended in some soft ink on the card base, and popped the card front up with foam tape.

Mama Elephant~Index Card-Creative Cuts

I used a bit of masking to huddle the cute critters from the Just Hatched stamp set and then colored them with Copics. 

Mama Elephant~Index Card-Creative Cuts

In my mind, I pictured these cute little critters visiting a newborn baby in the hospital, and they wanted to bring the baby some balloons. (Just go with it, lol.) So, I popped up a few balloons using the circle image from the Pandamonium stamp set and drew a few balloon strings. Super easy, cute and perfect for baby. That's all for today! Thanks so much for stopping by!

7.26.2014

Geotagged with Nichol!

Hello there! Nichol here today with a card showcasing the brand new Geotagged Creative Cuts Dies that coordinate with the Geotagged Stamp Set.

I incorporated the Hello Script Creative Cuts Die and Index Card Creative Cuts Dies to round out the stmaped die cut design.

Geotagged_NicholMagouirk1

I die cut a piece of smooth white cardstock using the Index Card Creative Cuts stitched rectangle die. I stamped the United States image using the Rock 'n Roll technique with five colors of Mama Elephant pigment inks: Apple, Orangeade, Sunshine, Mojito and Ocean.

I die cut the Hello Script Creative Cuts Die from the stitched rectangle Index Card Creative Cuts. I also cut another hello from some dark gray cardstock. I used the inlay die cutting technique to inlay the gray cardstock "hello" into the stitched rectangle. I added a stamped greeting under the die cut word to finish the card's greeting.

I stamped the suitcases from the Geotagged Stamp Se and die cut the pieces using the coordinating Geotagged Creative Cuts Dies. A stitched stamped line from the So Breezy Stamp Set and the stamped geotag die cut complete the design.

Geotagged_NicholMagouirk2

Want to see the step-by-step creation of this card? Please check out the video tutorial below:


Thanks for stopping by today!

7.25.2014

Bootastic with Elena!

Hi there, it's Elena with a Boo-tastic card!  It's beach-weather outside, but we're already looking to halloween. (I would ordinarily mind the thought of colder temperatures, but these images are so cute, I'd work with them anytime!)

I love the new dies that coordinate with the Bootastic stamp set.

20140625_46


I stamped a card-base full of bats, and then used the new dies to make the witch and her witchy-cat stand out. They are both propped up on foam adhesives and grounded by the sentiment banner, and the whole thing is framed by the dark sponging around the card-base.

20140625_52


I kept the color palette halloween-traditional with the black and orange, but added some blue and violet to keep things fresh and fun.

I hope you like it!

♥.

7.24.2014

Bootastic with Laura!

Hi everyone! Laura Bassen here, and today I have a fun card to share with you featuring the new Bootastic creative cuts that coordinate with the Bootastic stamp set.BootasticI used the creative cuts to make a partially die cut window, keeping the witch intact and popped up in front of her neon purple Halloween sky. IMG_0705This partial die cutting technique is so simple to do. Here's a quick little video to show you how easy it is. Thanks so much for stopping by!

7.23.2014

In My Heart with Operation Write Home's Sandy Allnock!

I'm Sandy Allnock and am so excited to be guesting over here on the blog....it's been such fun celebrating these brand new fundraiser stamps - In My Heart, as you probably know by now, generates income for the charity, Operation Write Home, until July 31st! As the Founder and Executive Director of the organization, I couldn't be more grateful for the support from our friends at Mama Elephant; and I know our deployed service members are so happy to have yet more generous people helping with the cause! If you've not been to the Operation Write Home website, please do check it out - the Welcome page is the best place for new folks to get questions answered, and OWHtv is a great place for video-friendly folks to learn as well! There are lots of free resources available, including tutorials, sketches, and so much more. I'm sharing a sweet little card today with the In My Heart set, and though you might expect a red, white, and blue card - we make all kinds of themed cards at OWH. Our most-requested theme is missing you cards - so I created one that could be sent home to kiddos. I made it slightly shorter than an A2 card since I wanted it to feel like a wide scene; our cards need to fit into A2 envelopes, and this one will! In my little scene, the grass is popped above the Copic-colored scene, and I also popped some little clouds in the sky. Sandy Allnock Asian In My Heart

I colored the little kiddos to look potentially Asian or Hispanic - since the card could be selected by an ethnic service member sending it to their kiddos at home. 

Sandy Allnock Asian In My Heart2

This stamp set is great for both groups of kids as well as using the children one at a time - as evidenced by all the wonderful cards on the Stamp Highlight post and the Stampede a few weeks ago! It seems like everyone loved the cards by looking through the comments on them all...so if you missed those posts, be sure to check out all the crafty goodness. Please do join us over at Operation Write Home.....we'll see you there as we serve our heroes!

SandySignature 

7.22.2014

Index Card CC with Pamela!

Good morning everyone! This is Pamela back with another Designer Series here and this month, ME is releasing a few coordinating Creative Cuts as well as a standalone die set. I worked with the Index Card creative cuts today. These are dies that everyone should have in their stash and I'm sure I'll be using them very often. For my card, I'm using the large stitched rectangle as well as the brackets to frame my focal point.

  DS - Index - 01 

 I used ink and blended the colours of her skirt. This is a good way to get a perfect gradient especially since I don't have enough copic markers to make a seamless blend.

DS - Index - 02

Ta da! Perfect gradient... all the time! DS - Index - 03 

 I used the sentiment from My Sunshine and stamped it right beside the little girl. To tie the "sunshine" theme with the card, I blended some orange and yellow onto the card base so they will peak through the brackets' negatives.

 DS - Index - 04

I'll be back next week for another Designer Series! Thanks for stopping by!

7.18.2014

Soiree stamps and cuts with Elena!

Hi, it's Elena!

I'm showing you a birthday card I made with the Soiree stamp set and new coordinating dies.

20140625_15


I am supposed to be showing off the dies, but I had too much fun stamping those banners!  I stamped four rows of the banner image, and colored them in different pink and blue shades, adding little dot and stripe accents with a white gel pen.

I then stamped "make a wish" repeatedly to look like a cake (!) and die-cut the cake stand and little banner topper.  Having the banner topper die-cut saved me from having to mask anything and I love how it looks popped up on foam adhesives.

20140625_19

I colored the cake topper banner to match the bigger banners, did you notice? I'm easily impressed, and hoping you are too...

A coat of glossy accents on the topper and the cake stand gives the card a special something extra.

I hope you like it! I can see making this card in a ton of different colors and keeping them on hand for last minute birthday needs :)

♥.

7.16.2014

Index Card CC with Nichol Magouirk (and a video!)

Hello there! Nichol here today with a new card showcasing the brand new ME Index Card Creative Cuts Dies. This fantastic new die set features a smaller version of the popular ME Femme Frames stitched rectangle and scalloped rectangle dies as well as the addition of some great punctution dies and a speech bubble! 

To create my card I first colored in the large floral stamp from the ME Water Blooms Stamp Set with Distress Markers, spritzed them with water a couple of times using a Mini Mister and stamped the image on Tim Holtz Watercolor Paper. I set the paper aside to dry while I worked on the rest of the card. 

ME_DesignerSpotlight_IndexCard

I die cut some vellum using the scalloped rectangle ME Index Card Creative Cuts die and stamped three greeting phrases from the ME Many Thanks Stamp Set using Versamark Ink and heat embossing the greetings with gold embossing powder.

ME_DesignerSeries_IndexCard3

I die cut the ampersand from some woodgrain paper and cut it again several times from smooth white cardstock. I glued them one on top of another ending with the woodgrain ampersand. I adhered the faux "chipboard" piece to the vellum as shown.

I die cut the watercolor paper using the stitched rectangle ME Index Card Creative Cuts die and glued the vellum over the watercolor design. I adhered the piece to a 4x5.5" card base using foam adhesive and finished the card with heart confetti die cut using the ME Confetti Creative Cuts die.

ME_DesignerSeries_IndexCard2 

Want to see this card being created step-by-step? Please check out the video tutorial below:


Thanks for hanging out with me here on the Mama Elephant blog today! Have a great rest of your week!

7.15.2014

July's Soft Release

Hi Everyone! It's Angela here with a card to share with you today to jump start our soft release this month! I dedicate this card to my husband who travels fairly often for business. My little interns always manage to let me know how much they wish their daddy was here.

I used the Geotagged Creative Cuts to die cut mini luggages and the shape of the United States for the background. I then paired it up with the little girl with her hands over her heart from the In My Heart stamp set and stamped the sentiment "wish you were here" from the Geotagged Stamp Set.


I hope everyone is having a wonderful summer!  I also want to remind you that there is still time to purchase the In My Heart Stamp set in our store to have 20% of the proceeds go to the efforts of Operation Write Home. 

Thanks for stopping by and remember to come back tomorrow as we start our Designer Series with our Design Team! 

7.14.2014

July Soft Release preview

Hi everyone! Angela and I are sort of out of our game right now. So many exciting things happening around here that we haven't had much time drumming up this newest soft release which goes live TONIGHT! It's sort of good that we didn't tease you with sneak peeks for a full week, right? :) So BAM! It's all available for purchase tonight at 12:00 AM EST!

Tonight's release consists of Creative Cuts only. We have heard ya loud and clear and created coordinating cuts with some of our previously released sets as well as a new stand alone one. Please check out the reveal below. Our spectacular Design Team will be here all month providing loads of inspiration with all the new Creative Cuts!

Index Card CC is a personal fave of mine. My favorite card size is actually not A2, but A1 which is the standard size of RSVP reply cards to give you an idea. This die set is perfectly sized for you to create those itty bittier sized cards along with some really awesome additions like the speech bubble and that gorgeous ampersand! You get 12 different cuts with this set! Love, love this one and I am sure you will too!!

Only 3 more months to Halloween! Because of our tight schedule, we don't have an actual Halloween set coming out this year. Instead we are introducing the coordinating Creative Cuts to Bootastic which was wildly popular last year! The images are so cute and timeless!


coordinates with Bootastic stamp set


Everyone needs a great general birthday set. And Soiree works for any age recipient!


coordinates with Soiree stamp set


Geotagged was one of our debut sets and I'm still smitten with the vintage luggage ...and that distressed map! <3


coordinated with Geotagged stamp set


Everything goes live in a few more hours! Thanks for stopping by tonight and I sure hope everyone is enjoying their Summer so far! :) Peace out!

7.03.2014

In My Heart with Pamela

Hello there! It's Pamela taking over the blog today with a card I made using the adorable stamp set 

 DS - In My Heart 

 I started off by masking a circle and blended some purple and blue for the sky and green for the grass. I flicked some water onto the blended purple and blue for a pretty night scene. I then adhered a few gold stars that I cut out using the starburst cover die.

  DS - In My Heart - 01 

 I love how the little girl looks like she's looking up into the sky and daydreaming! I finished the card off with some hand-stitching and a sentiment from the stamp set.

7.02.2014

Starburst Cover Creative Cut with Elena

Hi there, Elena here! I'm showing off a card I made with In my Heart 

be protected {mama elephant designer series}


I always thought the little boy looked like he was praying, and I love the sentiment from the same set.  I die-cut the starburst cover plate and nestled the sentiment into the space between the stars.

I connected the sentiment to the boy below by way of a hanging star (from the set Splendid.)

be protected {mama elephant designer series}


To make the sky look a little hazy, (after sponging and rubbing on the distress inks for the sky color,) I took an eraser and started to lightly remove some of the color. I love the effect that it gave!

I mounted the coverplate on foam squares to the card base, so that the yellow paper I adhered to the base would show through the starry peepholes. For a last touch, I added some of the cut-out stars - starry confetti is my new fave.

Thanks for stopping by!

♥.

7.01.2014

ME and ME challenge!

Hola friends! We are now dedicating a separate blog just for our challenges! Please check it out here and we welcome ALL to play along!